Upgrading the stereo system in your car with a quality noise filter can improve the sound by giving you a much clearer, noise-free listening experience. All the irritating engine rumbles, tire noise and electrical static can seriously ruin enjoying your favorite songs. Installing a good noise filter properly can make a huge difference, and it’s not too hard to put one in yourself. In this comprehensive guide, we’ll cover everything you need to know about how to install noise filter car audio.
What is a Noise Filter and Why Do You Need One?
A noise filter does just what it says – it filters out and removes noise. More specifically, it targets stuff like engine droning, tire hum, alternator whining, and other annoying sounds that overwhelm your speakers and make the music sound muddy and distorted. The noise filter goes in between your car stereo and speakers and cleans up the audio signal before it is amplified. It leaves the actual music and vocals alone while getting rid of all the unwanted junk noises.
The result is a much cleaner, more detailed listening experience. You’ll be able to pick out every part of your music, and vocals will stand out without all that background noise covering them up. Putting in a high-end noise filter is one of the simplest but most effective ways to dramatically improve the sound from the car audio system you already have.
How Does a Noise Filter Work?
Noise filters use some sophisticated digital audio processing technology to analyze the full range of frequencies coming from your car head unit. It separates the signal into many narrow bands and pinpoints exactly which bands contain unwanted noise and interference.
Once it detects the problem areas, it uses things like parametric EQ, adaptive filters, and crossover filters to target just those noisy frequencies and remove them before the signal ever reaches your amp and speakers.
Parametric EQ allows precisely tuning and turning down specific noisy frequency ranges. Adaptive filters automatically adapt to detect and tackle noise patterns in your car’s unique acoustic environment.
Crossover filters cut out frequencies that are too high or low for human hearing. Combining these techniques results in a crystal clear audio signal that’s had all the noise and interference filtered out, leaving you with only the pure music. Removing all that noise can dramatically clean up the sound.
Step-by-Step How to Install Noise Filter Car Audio

Putting in a noise filter only takes a few straightforward steps and about 15-30 minutes from start to finish. Here’s how to properly install one:
Step 1: Turn Off the Power and Disconnect Cables
First, turn off your car and stereo and disconnect all the power, speaker, and RCA cables from the back of the head unit and amplifier. Remove any interior trim panels needed to access the wires. This prevents any shorts while working.
Step 2: Find a Mounting Spot for the Noise Filter
Find a good out-of-the-way spot to mount the noise filter module itself, like under a seat or in the trunk somewhere. Use zip ties or Velcro tape to securely fasten it. Make sure the connecting cables will reach it.
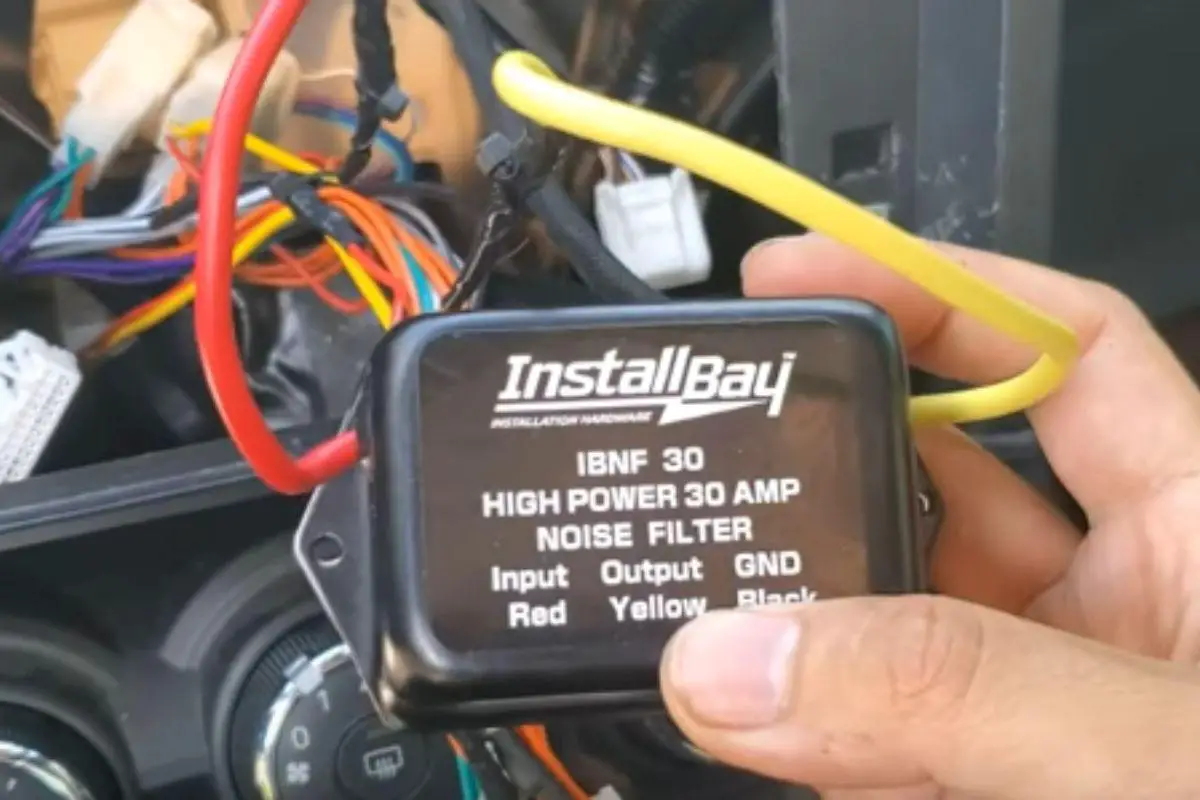
Step 3: Connect Cables to the Noise Filter
Next, connect the head unit’s RCA or speaker wire outputs to the input side of the noise filter. Then run new connecting cables from the filter’s outputs to your amplifier and speakers. Double-check check the signal flow is going through the filter in the right direction.
Step 4: Power On and Configure Filter
Once everything is hooked up correctly, reconnect the battery and turn the car stereo back on. The noise filter may come with a remote control or phone app to adjust its settings. Tweak the filter bands and EQ settings to optimize the sound and cut out the specific noise in your car.
And that’s it! With just those few simple installation steps, you have learned how to install a noise filter on a car stereo. In the end, you’ll have a professional-grade noise filter massively improving the clarity of your car audio and music quality. Take some time to play with the settings after listening for a while. Every car and stereo system is a little one-of-a-kind, so dialing in the ideal custom noise filtering takes some experimenting.
Where to Place Noise Filters in a Car Audio System
The most popular place to install the filter is right after the head unit, before the amplifier. This effectively cleans up noise from the head unit electronics and RCA cables. But you can also put it between the amp and speakers, or use small in-line filters on the RCA cables themselves. Installing it inside the amplifier housing works too if the amp has a built-in filter.
Tips and Tricks on How to Install Noise Filter Car Audio
Here are some handy tips for getting the maximum performance out of your new noise filter:
- Use high-quality, shielded RCA cables to prevent interference.
- Mount it somewhere away from moisture, heat, and vibrations.
- Check for firmware updates to take advantage of improved filtering algorithms.
- Carefully adjust frequencies slowly while critically listening.
- Tweak channels independently to correct imbalances.
- Gently apply parametric EQ cuts to avoid degrading audio quality.
- Save preset filter profiles to easily switch between settings.
- Consider a more advanced model with additional filter types for maximum capability.
- Add a second filter elsewhere in the system if more filtering is needed.
- Level match the sound with filtering on and off to better judge improvements.
Proper installation is important. But taking the time to fully optimize it and fine-tune the noise reduction will give you the cleanest and clearest possible sound.
Choosing the Best Noise Filter for Your Needs
There are several important factors to consider when picking the right automotive noise filter:
- Filter Types – More advanced filters (parametric EQ, adaptive, crossover, etc.) allow more noise reduction capability.
- Number of Channels – Match the number of filters to your amplifier channels for independent processing per channel.
- Audio Bit Depth – Look for 24-bit or 32-bit for the best possible audio quality.
- Sample Rate – 192 kHz sample rate prevents digital artifacts during filtering. Lower rates can degrade quality.
- Digital S/PDIF Input – Allows tapping the audio signal before the internal amp, avoiding interference.
- DFR (Dynamic Frequency Response) – Automatically adapts to optimize processing at different volume levels.
- Independent Channel Tuning – Allows asymmetric L/R filtering to correct imbalances.
Conclusion: Noise Filters Are a Worthwhile Car Audio Upgrade
Adding a dedicated noise filter to your car’s stereo system is one of the easiest and most effective upgrades you can do for dramatically better sound quality. All those annoying engine noises, whining, and interference get filtered out so you only hear pristine music. The installation process is pretty simple as we have just shown you how to install noise filter car audio in very easy-to-follow steps.
It will take some experimenting to get it tuned just right for your specific vehicle and audio equipment. But the effort is worth it. You’ll be amazed how much reducing the noise also reduces listening fatigue, especially on long drives. Noise filtering gives a big boost in clarity and enjoyment from the system you already have, for not a lot of money. Your music will sound clearer than ever before!
Also read:
Best Double Din Head Unit for the Money – Top 5 Reviews
Best Car Amplifier for Bass – Top 10 Picks
How to Install Car Sound Deadening Material

Kenny Owen is an acclaimed audio expert and longtime enthusiast with a deep passion for sound technology. With over 15 years of experience in the car and home audio industry, Kenny has established himself as a trusted authority on everything from speaker setups and amplifier configurations to the latest audio equipment and innovations.
Through his engaging writing style and meticulously researched articles, Kenny shares his vast knowledge on optimizing audio systems for superior sound quality. He provides in-depth tips and tricks for achieving the best listening experience, whether it’s tuning a car’s audio system for an immersive musical journey or creating a high-fidelity home theater setup. Additionally, Kenny’s comprehensive buying guides empower readers to make informed decisions when investing in audio components, ensuring they get the most bang for their buck.
