Ever since I was a teenager, car audio has been a huge passion of mine. While my friends were learning to drive, I spent all my free time perfecting the sound system in my old Civic hatchback. One of my first big projects was upgrading the worn-out door speakers to components – you should have seen the look on my face the first time I played music through the new setup. Hearing each instrument and vocal come through so clearly was unbelievable. That’s when I knew I wanted to make this hobby my career.
Now with over 15 years of experience installing car audio, I’ve helped hundreds of drivers upgrade their speaker systems. Properly installing new speakers is key to getting the full audio experience. Whether replacing blown speakers or doing a full system upgrade, following best practices ensures your speakers will perform great for years to come.
In this guide, I’ll share all the tips and tricks I’ve learned to help you confidently install your new speakers like a pro. I’ll cover everything from choosing the right speakers to must-have tools to step-by-step installation instructions for different speaker locations to proper wiring techniques to common mistakes to avoid. By the time you finish reading, you’ll have the knowledge and skills to complete your installation with quality workmanship. Let’s get started enhancing your driving music experience!
Choosing the Right Speakers for Your Car
The very first step is selecting the right speakers for your vehicle. Not all speakers are compatible with all cars, so it’s important to choose speakers designed specifically for your make, model, and year. Here are a few factors to consider:
Speaker Size – Check the size of the original speakers (usually listed as a diameter like 6.5″ or 6×9″ speakers) and get replacement speakers of the same size.
Mounting Depth – Measure the depth of the factory speaker mounting location to ensure the new speakers will fit properly.
Power Handling – Consider the factory stereo power output and aim for speakers rated to handle slightly more power for better performance.
Component vs Coaxial – Component systems with separate woofers and tweeters generally sound best, but coaxial speakers are easier to install.
Special Requirements – Some cars have extra depth or shape constraints, so research speakers tailored for your specific vehicle.
Spend time researching reviews online and in person at your local car audio shop to find the highest quality speakers that are a perfect fit for your car. Don’t skimp on this important selection step.
Required Installation Tools
To successfully install car speakers, you’ll need the right tools. Here’s a basic toolkit I’d recommend:
- Sockets and wrenches (metric and SAE sizes)
- Phillips and flathead screwdrivers
- Wire strippers/crimpers
- Soldering iron (optional but recommended)
- Electrical tape
- Wire snips/cutters
- Multimeter (helpful for testing)
- Trim/panel removal tools
- Drill and drill bits (only if modification is needed)
- Speaker wire (sold separately)
It’s also a good idea to have gloves to prevent cuts, rags for cleaning, and a flashlight for visibility. Consider investing in a more comprehensive tool kit from a place like Crutchfield if you plan multiple installations over time. Proper tools make the job safer and easier.
Installing Door Speakers

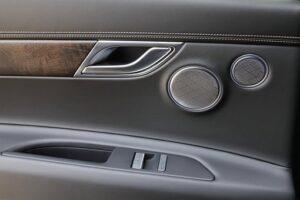
Door speakers are the heart of any car audio system, so let’s start with the most common installation location. The process is similar for front and rear doors:
- Disconnect the negative battery terminal for safety.
- Remove the door panel by sliding a trim tool around the edges to release clips.
- Locate and remove mounting nuts/bolts securing the factory speaker.
- Carefully detach the wiring harness from the back of the speaker.
- Attach the wiring harness to the new speaker, ensuring correct polarity (+ to +, – to -).
- Mount the speaker in the door using supplied hardware or factory bolts.
- Replace the door panel by snapping clips back into place.
- Reconnect the battery and test the speaker function before moving to other doors.
Take your time and be gentle removing door panels to avoid breaking clips. Test speakers individually before fully reassembling to catch any wiring issues.
Installing Dash Speakers

Dash speakers are usually coaxial designs that cleanly integrate into factory locations:
- Pry the grille away from the dash to expose speaker mounting screws or clips.
- Detach the wiring harness from the rear of the factory speaker.
- Connect the wiring harness to the new speaker following polarity markings.
- Mount speaker into factory dash cavity using original screws.
- Snap the grille cover back into place over the new speaker.
- Repeat the process for the passenger-side dash speaker.
- Test function before fully reassembling dash components.
Dash speakers tend to be simpler than doors, but take care not to scratch or damage fragile plastic dash panels during removal and replacement.
Installing Speakers in the Trunk

Rear decks or trunk speaker installations are very similar to dash speakers:
- Remove rear deck/trunk panel screws or clips to access speakers.
- Tag/photograph wires to ensure correct reconnection later.
- Unsnap the wiring harness clip from the back of the factory speaker.
- Attach wiring harness to new speaker per polarity markings.
- Mount the speaker into the rear deck using the provided mounting hardware.
- Replace the rear deck panel/trim piece to fully enclose the new speaker.
- Double-check wiring before final reassembly and testing function.
Ensure a tight, rattle-free seal when replacing trunk and rear deck panels to block incoming road noise.
Proper Speaker Wiring Techniques
The most common installation mistakes come from improper speaker wiring techniques. Let me share a few best practices:
- Use high-quality OFC (oxygen-free copper) speaker wire rated for your system’s power handling.
- Strip back just enough insulation for terminals – too much-exposed wire is a short waiting to happen.
- Attach the positive wire to the speaker terminal marked “+” and the negative to the “-” terminal.
- Double-check polarity before final assembly to avoid issues later.
- Crimp or solder all wire connections for a solid, vibration-resistant bond.
- Insulate connections thoroughly with heat-shrink tubing or electrical tape.
- Neatly tie up any excess wire out of the way using zip ties for a clean look.
- Consider upgrading existing wiring harnesses for improved signal transfer.
Taking your time to properly prepare and secure all wire connections is crucial to long-term reliability and performance. Don’t cut corners here.
Final Checks and Tips for Success
Once you’ve finished the physical installation, a few final checks are recommended:
- Reconnect the battery and cycle audio power to reset any modules.
- Test all speakers individually with music playing to ensure function.
- Walk around outside and listen for any rattling panels or loose hardware.
- Perform a sound quality audit – check for localized distortion or resonance issues.
- Consider sound-deadening door panels for reduced vibration/rattles.
- Calibrate the system and balance fader/gain using a test tone disc.
- Educate end users not to blast high bass without speakers breaking in.
Catching any rattles or wiring issues now saves future troubleshooting hassles. A little tuning unlocks the full sonic potential of your new speaker setup.
With the right preparation, tools, and techniques, you now have what it takes to successfully install any car speakers on your own. Installing speakers professionally is satisfying and will save you money versus paying a shop. Happy listening!
Also read: How to Wire a Car Stereo without a Harness

Kenny Owen is an acclaimed audio expert and longtime enthusiast with a deep passion for sound technology. With over 15 years of experience in the car and home audio industry, Kenny has established himself as a trusted authority on everything from speaker setups and amplifier configurations to the latest audio equipment and innovations.
Through his engaging writing style and meticulously researched articles, Kenny shares his vast knowledge on optimizing audio systems for superior sound quality. He provides in-depth tips and tricks for achieving the best listening experience, whether it’s tuning a car’s audio system for an immersive musical journey or creating a high-fidelity home theater setup. Additionally, Kenny’s comprehensive buying guides empower readers to make informed decisions when investing in audio components, ensuring they get the most bang for their buck.

