Have you ever found yourself stuck in traffic, wishing your car’s audio system could transport you to a world of crystal-clear sound and seamless connectivity? As a professional car audio installer with over a decade of experience, I’ve seen firsthand how a simple upgrade can transform a mundane commute into an immersive audio experience. Today, I’m excited to guide you through the installation process of the XDVD176BT dual radio, a versatile head unit that’s become a favorite among my clients.
This article is designed to walk you through the entire xdvd176bt dual radio installation process, from unboxing to fine-tuning. Whether you’re a DIY enthusiast looking to tackle your first car audio project or a novice seeking to understand the intricacies of modern head units, I’ve got you covered. We’ll explore the XDVD176BT’s key features, navigate the installation steps, and troubleshoot common issues to ensure your upgrade goes smoothly.
The XDVD176BT is more than just a radio replacement; it’s a multimedia powerhouse. With its large touchscreen display, Bluetooth connectivity, and support for various audio and video formats, this double DIN head unit brings your dashboard into the 21st century. But before we discuss the installation process, let’s start with the basics.
Unboxing and Package Contents
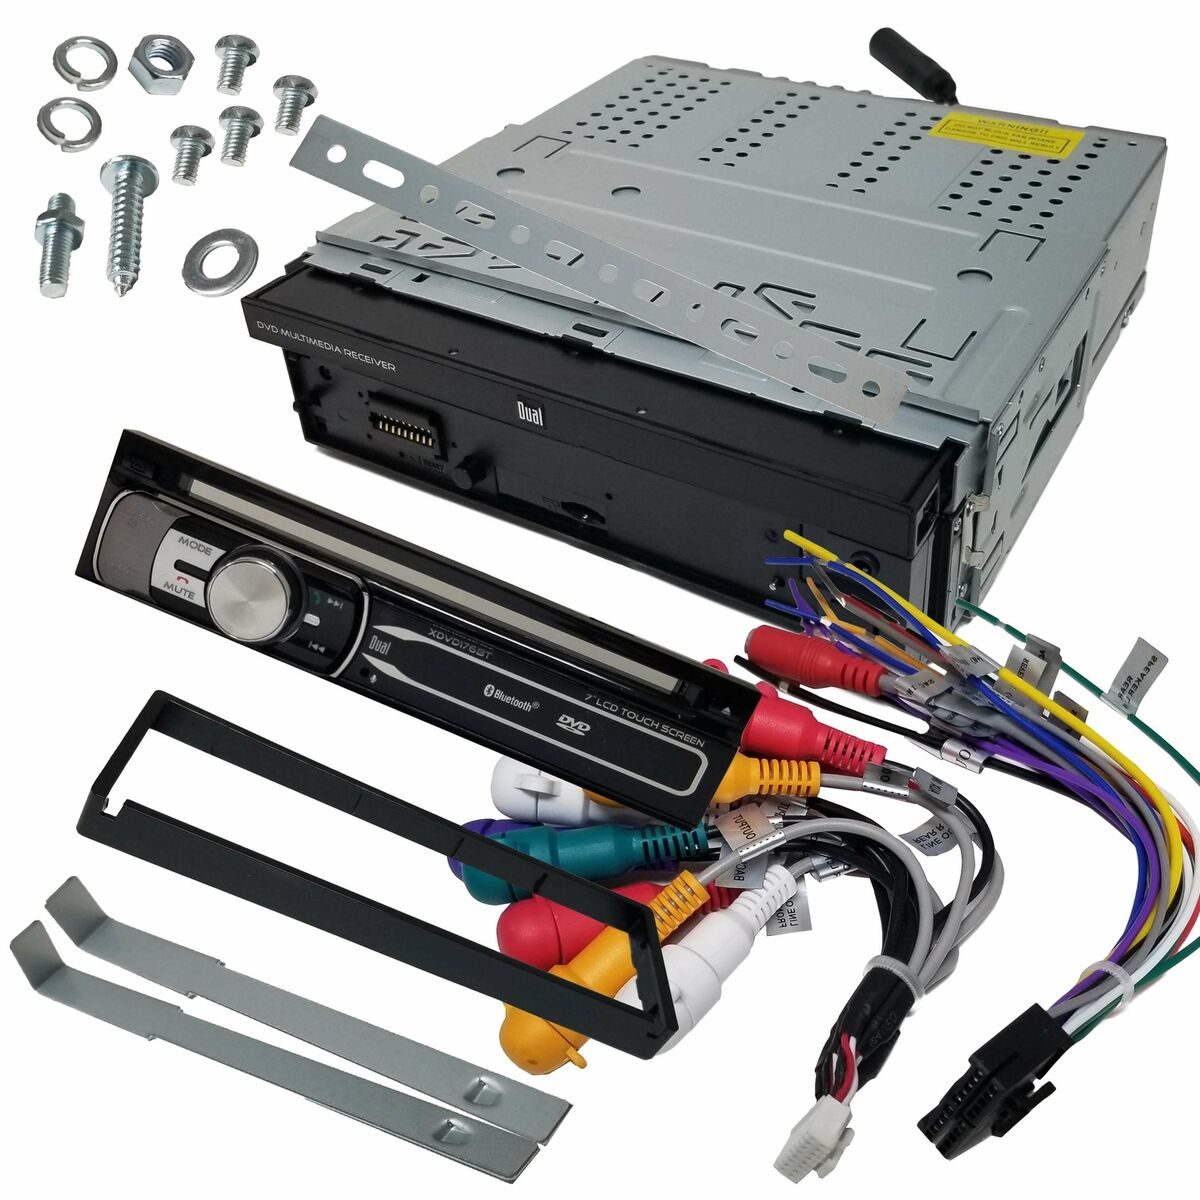
When I receive a new XDVD176BT for a client, the first thing I do is carefully unbox and inspect the contents. Here’s what you should typically find in the package:

1. XDVD176BT head unit
2. Remote control
3. Wiring harness
4. GPS antenna
5. Microphone for hands-free calling
6. Mounting brackets
7. User manual and warranty information
It’s crucial to check each component for any signs of damage or defects. I always recommend my clients do this immediately upon receiving their unit, as it’s much easier to address any issues before installation begins.
Required Tools and Materials
Before we get our hands dirty, let’s make sure we have all the necessary tools and materials. Based on my experience, here’s what you’ll need for a smooth xdvd176bt dual radio installation:
Tools:
– Screwdriver set (Phillips and flathead)
– Pliers
– Wire strippers/crimpers
– Multimeter
– Trim removal tools
– Socket set (for some vehicles)
Materials:
– Wiring harness adapter (specific to your vehicle make and model)

– Dash kit (if required for your vehicle)

– Electrical tape or heat shrink tubing

– Zip ties for cable management

– Soldering iron and solder (optional, but recommended for a more secure connection)

Having these tools and materials ready before you start will save you time and frustration. Trust me, there’s nothing worse than being halfway through an installation and realizing you’re missing a crucial tool!
Car Preparation: Removing the Old Head Unit
Safety should always be your top priority when working on your vehicle. The first step in any car audio installation is to disconnect the negative terminal of your car battery. This prevents any short circuits and protects both you and your vehicle’s electrical system.
Next, we’ll remove the old head unit. The process varies depending on your vehicle make and model, but generally involves these steps:
1. Remove any trim pieces surrounding the radio using trim removal tools.
2. Locate and remove the screws or bolts securing the head unit in place.
3. Carefully pull the old head unit out of the dash, being mindful of any connected wires.
4. Disconnect the wiring harness and antenna cable from the old unit.
Throughout my career, I’ve worked on countless different vehicle models, and I can’t stress enough the importance of being gentle during this process. Dash components can be fragile, and a rushed removal can lead to broken clips or scratched surfaces.
Installing the Dash Kit (if necessary)
Many modern vehicles require a dash kit for proper fitment of an aftermarket head unit like the XDVD176BT. These kits help bridge the gap between your vehicle’s dash opening and the new radio, ensuring a factory-like finish.
To install the dash kit:
1. Identify the correct mounting points in your vehicle’s dash.
2. Secure the dash kit using the provided screws or clips.
3. Test fit the XDVD176BT in the dash kit to ensure proper alignment.
A well-installed dash kit not only looks professional but also helps secure the head unit, reducing vibration and potential damage over time.
Connecting the Wiring Harness
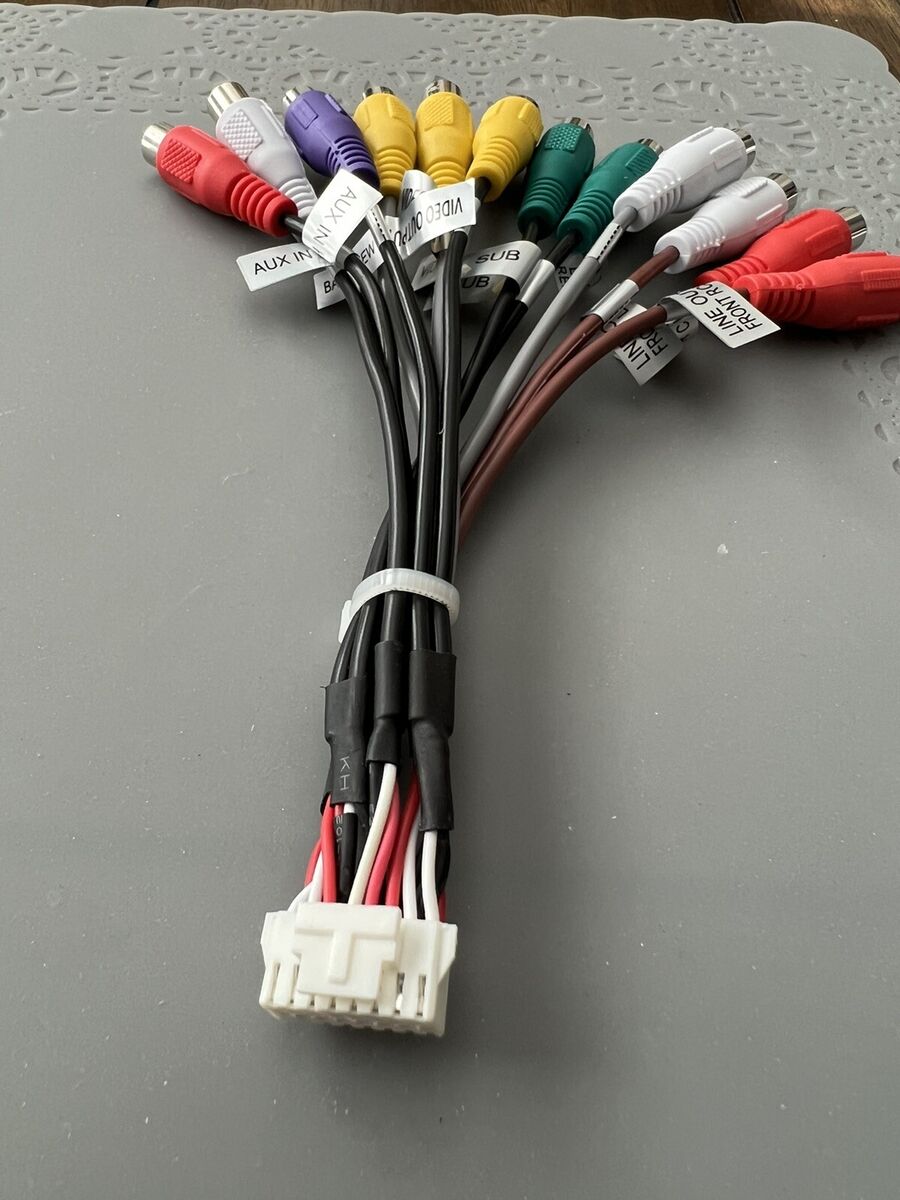
Now we’re getting to the heart of the xdvd176bt dual radio installation. The wiring harness is your lifeline to integrating the new head unit with your vehicle’s electrical system. Here’s how I approach this crucial step:
1. Start by identifying the color codes on both the XDVD176BT’s harness and your vehicle-specific adapter.
2. Match and connect the corresponding wires. Typically, you’ll find:
– Red: 12V Constant power
– Yellow: 12V Switched power
– Black: Ground
– Blue: Power antenna/amp remote
– Orange: Illumination
– Various other colors for speaker connections
3. I always recommend soldering these connections for the most reliable and durable setup. If you’re not comfortable soldering, use crimp connectors or twist caps, ensuring a tight and secure fit.
4. Pay special attention to the ground wire. A poor ground connection is often the culprit behind many audio issues. I prefer to connect it directly to a clean, unpainted metal surface on the vehicle’s chassis.
Remember, proper wiring is crucial for both functionality and safety. Take your time with this step, and double-check your connections before proceeding.
Installing the XDVD176BT
With the wiring harness prepared, we’re ready to install the XDVD176BT head unit:
1. Carefully slide the head unit into the dash opening or dash kit.
2. Connect the wiring harness to the back of the unit.
3. Attach the antenna cable and any additional connections (USB, AUX, etc.).
4. Before fully securing the unit, test the fit to ensure all buttons and controls are accessible.
5. Once you’re satisfied with the positioning, secure the head unit using the mounting brackets or screws provided.
Throughout my years of installations, I’ve learned that a little patience goes a long way. Take your time to ensure everything is properly aligned and securely fastened.
Testing the Installation
The moment of truth has arrived. It’s time to reconnect the car battery and power on your new XDVD176BT. Here’s what I check during the initial power-on test:
1. Does the unit power on correctly?
2. Are all speaker channels working?
3. Do the touch screen and physical buttons respond as expected?
4. Is the radio reception clear?
5. Does the Bluetooth function pair with your phone?
Once basic functionality is confirmed, I like to take my clients through a guided tour of the XDVD176BT’s features. We’ll explore the menu system, adjust audio settings, and set up any personalized preferences.
Troubleshooting Common Issues
Even with careful installation, issues can sometimes arise. Here are some common problems I’ve encountered and their solutions:
1. Head unit not powering on:
– Check all power connections, especially the constant and switched power wires.
– Verify fuse integrity both in the vehicle and on the head unit.
2. No sound or sound from only some speakers:
– Double-check all speaker wire connections.
– Ensure the fade and balance settings are centered.
– Verify that any external amplifiers are properly connected and powered.
3. Touchscreen unresponsive or display issues:
– Check for any protective film on the screen that may need removal.
– Ensure the unit is receiving a stable power supply.
– In rare cases, a factory reset may be necessary.
Additional Tips and Tricks
To get the most out of your new XDVD176BT, here are some tips I share with my clients:
1. Customizing audio settings:
– Take time to adjust the equalizer settings for your preferred sound signature.
– Experiment with the time alignment feature for optimal sound staging.
2. Bluetooth connectivity:
– For the best audio quality, use the highest Bluetooth codec supported by both your phone and the head unit.
– Keep your phone’s Bluetooth device list clean by removing old or unused connections.
3. Using external inputs:
– When using the USB input, ensure you’re using a high-quality cable for reliable connectivity.
– For auxiliary inputs, a gold-plated cable can provide better signal quality and durability.
4. Regular updates:
– Check the manufacturer’s website periodically for firmware updates that can improve functionality or add new features.
Conclusion
Installing the XDVD176BT dual radio is a rewarding project that can significantly enhance your in-car entertainment experience. We’ve covered the entire process, from unboxing to fine-tuning, providing you with the knowledge to tackle this upgrade confidently.
Remember, the key to a successful installation lies in careful preparation, attention to detail, and patience. Don’t rush the process – take your time to ensure each step is completed correctly. If at any point you feel unsure or overwhelmed, don’t hesitate to consult the user manual or seek help from online forums dedicated to car audio enthusiasts.
As you begin to explore your new XDVD176BT, you’ll discover a world of audio possibilities at your fingertips. From crystal-clear sound reproduction to seamless smartphone integration, this head unit is designed to transform your daily commute into an enjoyable audio journey.
I encourage you to experiment with the various features and settings. Each vehicle and listener is unique, so take the time to find the perfect setup for your preferences. And remember, the learning curve is part of the fun – embrace it!
For those seeking additional resources, I recommend checking out the manufacturer’s website for detailed specifications and potential firmware updates. Online car audio forums can also be invaluable for troubleshooting tips and creative installation ideas. Also, feel free to ask me any questions in the comments sections. I will be glad to help.
With your new XDVD176BT installed and optimized, you’re now ready to hit the road and enjoy a vastly improved audio experience. Happy listening, and safe travels!
Also Read:
Best Double Din Head Unit for the Money – Top 5 Reviews
Best 6.5 Car Speakers- Top 10 Picks and Reviews
Frequently Asked Questions on XDVD176BT Dual Radio Installation
How to reset dual xDVD176BT?
To reset your dual xDVD176BT, locate the small reset button on the front panel or behind the faceplate. Use a paperclip or similar object to press and hold this button for about 5-10 seconds until the unit powers off and restarts.
Does the dual XDVD179BT have navigation?
The dual XDVD179BT does not come with built-in navigation. However, it supports smartphone mirroring, allowing you to use your phone’s navigation apps through the head unit’s display.
How to reset dual bluetooth radio?
To reset a dual Bluetooth radio, first turn off the unit. Then, press and hold the power button for about 10 seconds until you see the reset indication on the display. Release the button and allow the unit to restart.
How to turn on XDVD269BT?
To turn on the XDVD269BT, simply press and hold the power button on the unit’s front panel. If it doesn’t power on, check your vehicle’s ignition and ensure all wiring connections are secure.
What is the PIN code for Dual Media Player?
The default PIN code for most Dual Media Players is 0000 or 1234. If these don’t work, consult your user manual or contact Dual’s customer support for assistance.
How do I factory reset my dual xdm17bt?
To factory reset your dual xdm17bt, power on the unit and press the Menu button. Navigate to the System settings and look for a “Reset” or “Factory Reset” option. Select this option and confirm to restore the unit to its original settings.

Kenny Owen is an acclaimed audio expert and longtime enthusiast with a deep passion for sound technology. With over 15 years of experience in the car and home audio industry, Kenny has established himself as a trusted authority on everything from speaker setups and amplifier configurations to the latest audio equipment and innovations.
Through his engaging writing style and meticulously researched articles, Kenny shares his vast knowledge on optimizing audio systems for superior sound quality. He provides in-depth tips and tricks for achieving the best listening experience, whether it’s tuning a car’s audio system for an immersive musical journey or creating a high-fidelity home theater setup. Additionally, Kenny’s comprehensive buying guides empower readers to make informed decisions when investing in audio components, ensuring they get the most bang for their buck.