From the first day I installed my first set of aftermarket speakers in my 1990 Honda Civic as a teenager, I have been hooked on pursuing the perfect sound. While that initial system left much to be desired, it sparked a passion that has kept me constantly learning, upgrading and perfecting my knowledge of car audio for over 15 years. One area I have found especially important is properly handling tweeters, as their delicate cones require careful installation and wiring to perform at their full potential without noise issues. In this extensive guide, I will share everything I have learned through years of experience helping clients on how to wire tweeter with capacitor.
The first tweeter upgrade I attempted involved simply wiring one directly to an amplifier output without any capacitor protection. Within minutes, an unpleasant buzzing emerged leading to a completely blown driver. I didn’t realize at the time, but a tiny capacitor can make an enormous impact on tweeter performance by blocking frequencies they cannot handle. Their importance became very clear after that expensive lesson!
This in-depth tutorial explores everything involved in selecting the optimal capacitor and properly installing tweeters, from component basics to wiring techniques to placement tips. Whether you’re new to car audio or an experienced enthusiast, you’ll gain a thorough understanding of why tweeters require capacitor protection and the keys to ensuring your upgraded high-frequency solution lives up to its full potential for many years of clear, undistorted sound enjoyment.
We’ll start by examining how tweeters and capacitors function individually before exploring considerations for choosing the right capacitor model. Guidelines cover safety practices, mounting tweeter locations and necessary tools. You’ll then learn how to connect tweeters to capacitors and amplifiers, including crossover settings. Lastly, additional factors like tuning, placement optimization and ground noise solutions round out this comprehensive resource.
Understanding Tweeters and Capacitors
Tweeters
As the name suggests, tweeters are responsible for reproducing the highest frequencies or “tweets” in an audio system’s overall soundstage. Their dedicated design consists of an extremely light and responsive speaker cone able to move with micro-precision over 160 times per second – the fastest vibrations detectable by human ears.
This nimble characteristic enables tweeters to generate the airy, detailed qualities present in music like cymbal crashes, guitar strum textures, subtle sound effects and intelligible consonants within vocals. Recreating these fine nuances is what brings recordings vividly to life. At the same time however, tweeters require careful installation to avoid damage from excess vibrations outside their operating range.
The majority of aftermarket tweeters are designed to efficiently handle frequencies from 2,000 Hz up to around 20,000 Hz, with some high-end models extending beyond the 22,000 Hz milestone. While mostly incapable of weighty low-end reproduction, their addition creates a wider soundstage, improved clarity and a seamlessly immersive auditory experience when paired with appropriate drivers for lower midranges and bass.
Investing in quality tweeters tailored to your vehicle’s environment unlocks a whole new realm of detailed notes previously masked or distorted by basic factory setups. However, wiring tweeters improperly without protection can potentially ruin their fragile cones. This makes selecting the right capacitor model paramount to long-term tweeter functionality and ultimate system performance.
Capacitors
Capacitors store electrical energy through a basic phenomenon called capacitance, measured in the unit of a microfarad (uF). Their construction consists of two conductors insulated from one another by a dielectric material such as paper, plastic, ceramic or electrolytic fluid. During operation, opposite electric charges distribute across the conductors’ surfaces contained by the dielectric without passing current.
This storage of capacitive reactance forms the foundation of how capacitors interact with alternating current signals. They allow AC frequencies to pass through based on the capacitor’s capacitance rating, while blocking direct current signals. This frequency selective behavior creates their indispensable role within speaker crossover networks.
Crossovers divide an amplifier’s output into specific bandwidths tailored for different driver types by embedding capacitors and inductors. For instance, a basic two-way setup uses capacitors to send high-midrange/high frequencies to tweeters while blocking low bass outside their operating parameters. Properly “capacitor loading” tweeters in this manner prevents damage from pressure excursions beyond their safe mechanical tolerances.
Some key capacitor specifications to note include capacitance value (marked in microfarads or uF), voltage rating (should exceed the amplifier’s maximum output), and polarity type (tweeters demand non-polarized). Paying close attention to datasheet guidelines ensures choosing the right model optimized for a tweeter’s technical specifications and intended crossover point integration. This upfront component matching forms the cornerstone of any quality installation.
Crossover Networks
Crossover networks serve as the traffic cops of a speaker system, directing particular frequency ranges to their matching drivers. A basic two-way setup incorporates a single crossover to split signals between tweeters and wider-range woofers/midwoofers. Three-way designs add a midrange speaker and use dual crossovers. Complex multichannelprocessors offer adjustable, multi-band crossovers.
Regardless of complexity, crossovers function through passive filters featuring capacitors and inductors arranged in different configurations. Butterworth, Bessel and Linkwitz-Riley alignments tailor filter slopes for specific purposes. Capacitor values, coil inductions and crossover points are carefully determined to achieve an acoustically transparent blend between speakers.
While some factory head units incorporate basic onboard processing, aftermarket amplifiers often lack internal crossovers requiring an external solution. Passive crossovers connect directly to speaker terminals, with active designs plugging into an amp via RCA or speaker wire. Dedicated DSP controllers bring the most customization flexibility through additional parametric EQ, time alignment and more.
Allocating frequencies appropriately throughout drivers digitally or passively remains paramount for exacting sound quality. And within any crossover scheme, properly capacitor-loading tweeters remains the key first step toward realizing their detailed, distortion-free potential contributing to a cohesive, encompassing soundstage. Their inclusion elevates any system to new heights.
Choosing the Right Capacitor
Capacitance Value
When choosing a capacitor, the first specification to consider involves its capacitance rating, typically expressed in microfarads (uF). This value controls what frequency range reaches the tweeter by forming a high-pass filter with the speaker’s inherent impedance.
As a general starting point, most basic tweeter installations call for a 2.2-4.7uF capacitor. However, always verify the manufacturer’s minimum recommended capacitance for the specific tweeter model as well. Performance-oriented designs may specify higher values up to 10uF or more, shifting their cutoff frequency lower.
Lower capacitances around 1uF tend to be suitable for dome tweeters playing up to 22kHz, while 1.5-2.2uF suits most common soft domes or ribbons handling a more moderate 15-20kHz range. Larger capacitors upward of 4.7uF work better with traditional paper tweeters only intended for basic intelligibility below 15kHz.
If uncertain, measuring impedance curves with a waveform generator and oscilloscope helps determine the optimum capacitance where rolloff smoothly begins transitioning higher frequencies to the tweeter. Trusted online impedance graphs for common drivers also provide a useful starting point when datasheets lack guidance. Ultimately the goal remains an acoustically inaudible seam between speakers.
Polarity
While polarity does not affect AC signal purity sent to a tweeter like with a woofer where phase matters, only non-polarized (bipolar) capacitors should be used. Also called “non-polar” or “uni-polar”, these bidirectional components tolerate DC blocking in either direction without issues.
Conversely, polarized capacitors internally differentiate positive and negative connections. They can explode if wrongly installed, posing a catastrophic tweeter failure risk from reverse polarity damage. Always choose non-polar electrolytic capacitors specifically labeled as such for safety. Reputable brands further reduce failure chances from electrolyte leaks.
Voltage Rating
The voltage rating of a capacitor refers to the highest continuous operational voltage it can withstand before electrical breakdown. For car audio applications, pick a model rated 50-100V or higher to exceed any amplifier’s maximum output.
Most standard car audio gear peaks around 70VRMS, which is sufficient for 100VDC electrolytic capacitors. However, higher-powered class D amps pushing beyond 100WRMS may require stepping up to 150V or even 200V ratings for the extra voltage headroom margin of safety. Consult technical specifications for any aftermarket amplifier to verify its maximum output voltage.
With these three key criteria—capacitance value, non-polar design and sufficient voltage rating—selecting a capacitor ideally suited to protect tweeters represents the foundation for a long-lasting, distortion-free installation. Their matching lays the groundwork for proper wiring covered in upcoming sections.
Preparing for Installation
Gathering Tools
A handful of basic tools simplifies any wiring project:
- Wire Strippers – Essential for precisely exposing conductor strands.
- Crimp Connectors – Safely join wires without soldering. Opt for high-quality gold-plated versions.
- Soldering Iron (optional) – For engineers preferring a permanent bonded joint. Use rosin-core lead-free solder.
- Electrical Tape – Insulates connections from shorts and elements.
- Wire Cutters – Trim leads professionally and safely.
- Crimping Pliers – Factory crimps connectors uniformly onto wire.
- Multimeter – Measures voltage and ensures proper installation.
- Protective Gloves – Handle capacitor safely if discharging stored energy.
- Safety Goggles – Prevent material from contacting eyes if clipping wires.
Besides these, spring-loaded pin tools extract factory clamps holding stock speakers in place for tweeter installation. Zip ties aid securing wiring neatly out of sight. Consider knee pads or seat cushions for lengthy under-dash tasks as well.
Safety Precautions
Always disconnect the vehicle’s negative battery terminal before working on any electrical system to avoid accidental short circuits, sparking or shock from live terminals. This simple preventative measure provides an extra layer of protection against potentially dangerous voltage when installing or modifying components near the amp or speakers.
Wear appropriate protective equipment as well such as gloves and goggles when handling batteries or capacitors which can retain hazardous stored charge even when disconnected. Never install any aftermarket audio equipment including tweeters while operating the vehicle. And double check wire routing avoids interference with pedals or airbags once complete for operation safety.
Choosing a Location
Selecting the optimal mounting location impacts tweeter performance significantly. A-pillars provide an ideal centralized position producing a spacious soundstage when angled toward the rear headrests. Pillar pods achieve nearly identical results with less obtrusive visibility.
Alternatives like doors or dash work only if tweeters aim the rearbaseof the listener, yet introduce more resonance interference possibilities. Strong vibration damping ensures clear sound reproduction. Avoid surfaces transferring bumpy road feedback like gloveboxes, which blur delicate high-frequency details.
Always use thread-locking washers securing inexpensive tweeters transported regularly. More substantial models elevate audio fidelity mounting on ABS plastic, dampened MDF or fiberglass for rigidity transferring vibrations away from cones. Patience during installation reaps huge rewards through exquisite transducer placement.
Wiring the Capacitor
Now that tools, safety gear and locations are prepared, we begin actually wiring a capacitor to the tweeter with multimeter in-hand for polarity checking. Production quality hinges on clean, secured connections minimally stressed yet fully insulated from shorts.
Identifying Wires
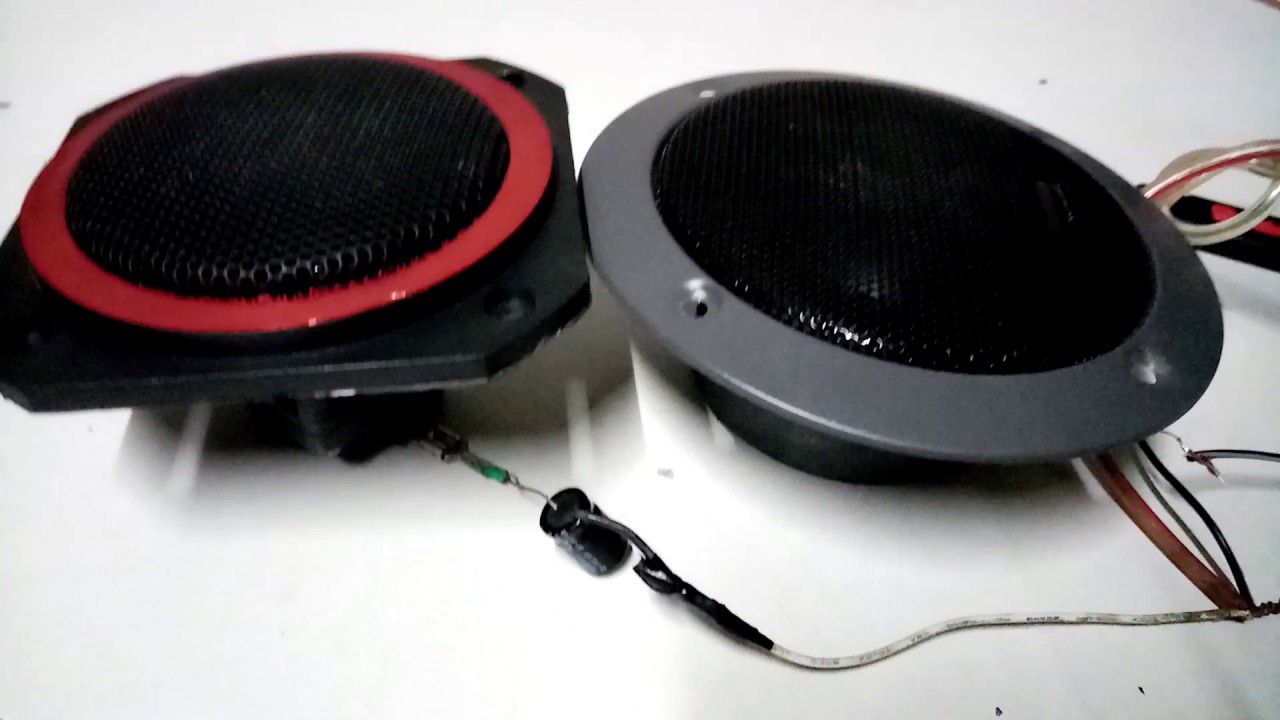
Carefully inspect both the capacitor and tweeter, locating polarity markings. Most capacitors have colored stripes while tweeters label positive (usually red) and negative (typically black) leads. Marking wire ends avoids mix-ups during connection. Strip 1⁄4” insulation from each lead and tweeter terminal using strippers.
Connecting the Capacitor
Lay out the bare wire ends parallel in polarity order. Slide heatshrink tubing insulation over exposed tweets wire for protection afterwards. Then crimp spade terminals onto the capacitor leads and tweeter wires, or directly solder leads if preferred. The positive tweeter terminal connects to the capacitor’s positive terminal, negative to negative.
Inspect solder joints or crimps for full metal contact and insulation from one another. Gently tug wires to ensure secure mechanical and electrical bonds. Measure with a multimeter set to continuity/diode function, verifying it beeps consistently across the capacitor + and – leads in one direction, open in reverse.
Polarity
Double and triple check polarity orientation before closing any enclosures! Even momentarily reversing a capacitor risks destroying a tweeter. Your multimeter proved thewiring functions as intended, so have confidence movingforward while always verifying device pins match up properly. Remember, tweeters like capacitors only function in one polarity direction for safety and performance.
Always perform a final polarity sanity check by tracing wire colors from start to finish pointing in the same direction before powering on newly installed equipment. Proper precaution massively outweighs a costly warranty repair! With everything safely connected, we move our focus to amplifier wiring.
How to Wire Tweeter with Capacitor
Wiring tweeters to amplifiers seamlessly integrates them within the larger system for pristine playback. Quality installations rely upon clean connections secured out of harm’s way, with each step verified preventing issues down the line. Let’s connect our protected tweeter!
Connecting to the Amplifier
Most amplifiers feature L/R “high-frequency outputs” dedicated for tweeters separately bridged from woofers. Connect the tweeter’s positive lead to the right channel output terminal, negative to the corresponding ground.
Budget amps sometimes only provide combined full-range speaker-level outputs instead of high/low-level RCA inputs. To utilize passive crossovers or capacitors externally, tap signal wires after internal crossovers or main speaker outputs respectively. Either way, double check polarity corresponds between amplifier and tweeter/capacitor assembly.
Insert tweeters positive lead into the proper high-frequency output terminal matching its label, negative to ground. Crimp or solder and heatshrink all connections. Once more review orientation before concluding with a final multimeter polarity confirmation for peace of mind.
Crossover Settings
Adjustable two-way amp crossovers allow tailoring frequency ranges sent to tweeters. Generally start at 2,500Hz-4,000Hz cutoff with a gradual 12dB/octave slope, tweaking higher/lower to personal taste. Avoid overly steep slopes distorting response.
Passive crossovers require selecting components generating the desired crossover specification. Their set points tend lower to accommodate component tolerances inherently impacting slope steepness versus active designs. Online calculators aid selection based upon impedance curves.
Speaker Level Inputs
For amplifiers lacking RCA high-level inputs, an alternative taps speaker wire signal after internal crossovers or at speaker outputs. While functional, this bypasses critical system processing potentially degrading soundquality. Whenever possible upgradingto a modern amplifier preserves optimal frequency separation digitally within its DSP controls.
Tweeters now receive protected, bandwidth-limited signals harmoniously integrated throughout the passenger cabin. Their gentle handling delivers transparent, distortion-free high notes above all else. Our work culminates providing years of artistic enjoyment!
Additional Considerations
Properly installing tweeters lays the crucial foundation, yet subtleties remain optimizing their contribution enhancing any system. Let’s explore additional tweaks maximizing performance:
Tweeter Placement
Experiment tweeter angles pointed slightly toward the ceiling for a spacious auditory experience. Also evaluate suitable install heights – too low muddies finesse while excessive height yields harshness. Place nearest ear level wherever mounted for optimal localization.
Pulse test tones verify legitimate dispersion filling the intended listening area without undesirable lobing effects. Absorptive dynamat applied judiciously further minimizes resonance cancelling sound quality. Rigorous testing merits persistance validating immersive soundstaging.
Amplifier Tuning
Accurately set gains maintaining a sufficient signal yet avoiding clipping protects speakers. Use calibrated test tones and a volt meter alongside signal generators ensuring perfect left/right balance.
Subtle EQ tailors frequency response correcting any dips within a tweeter’s operating range restoring missing detail. Gain structure must remain linear avoiding distortion otherwise obscuring nuances tweeters articulate exquisitely.
Ground Loop Isolators
Rarely, alternating current noise sneaks into audio signal grounds inducing hum. A line-level isolator between head unit and amp decouples any interference restoring the silence required appreciating finest frequency gradations. Isolating tweeters alone often proves less affective than addressing the root cause at the source device level input stage.
Proper tuning crowns the listening experience with their transparent, natural recreation of highs surrounding audiences within a holographic soundfield. Pursuing this level of quality consistently rewards years of study and hands-on refinement proving well worth the effort.
Conclusion
In conclusion, I hope this extensive guide on how to wire tweeter with capacitor has equipped you to upgrade your system with truly optimized tweeters through careful consideration of component selection, installation methodology, and tuning subtleties. Years refining these techniques have constantly impressed upon me how profoundly protective capacitors and matching signal pathways shape high-frequency playback.
By taking the time covered here to fully understand tweeters’ technical requirements, carefully prepare, and verify each step collaborating seamlessly from start to finish, your tweeters unlock a new world of clarity, ambience and nuanced details. Please enjoy the fruits of your labor for many happy hours of discovery! I’m always available should any other question arise down the road.
FAQs on How to Wire Tweeter with Capacitor
Does a tweeter need a capacitor?
Yes, a tweeter requires a capacitor to block low frequencies it cannot handle from reaching the delicate cone. The capacitor protects the tweeter by acting as a high-pass filter.
Which wire is positive on a tweeter?
Generally, the red wire is positive and the black wire is negative on a tweeter. However, it’s always best to check the manual or wires directly to verify polarity before connecting anything.
How to calculate capacitor for tweeter?
To calculate the right capacitor value for a tweeter, check its specifications for the recommended minimum capacitance level or reference impedance graphs showing typical rolloff points for that model.
How do you wire tweeters?
To wire tweeters, connect the positive lead to the positive terminal on both the capacitor and amplifier. The negative lead attaches to the negative sides. Always double check polarity is consistent throughout the wiring.
Will a capacitor help my sound system?
Adding a capacitor can certainly benefit a sound system by protecting tweeters from overload. It blocks low frequencies outside their range, preserving clarity and preventing damage to the delicate cone.
What happens when you put a capacitor on a speaker?
Attaching the right capacitor to a tweeter allows only high frequencies to pass through to the speaker. This shields it from unnecessary vibrations that could reduce its lifespan or cause distortion in its reproduction of higher notes.

Kenny Owen is an acclaimed audio expert and longtime enthusiast with a deep passion for sound technology. With over 15 years of experience in the car and home audio industry, Kenny has established himself as a trusted authority on everything from speaker setups and amplifier configurations to the latest audio equipment and innovations.
Through his engaging writing style and meticulously researched articles, Kenny shares his vast knowledge on optimizing audio systems for superior sound quality. He provides in-depth tips and tricks for achieving the best listening experience, whether it’s tuning a car’s audio system for an immersive musical journey or creating a high-fidelity home theater setup. Additionally, Kenny’s comprehensive buying guides empower readers to make informed decisions when investing in audio components, ensuring they get the most bang for their buck.