1. Introduction
Imagine turning the key in your ignition and being greeted not just by the purr of your engine, but by a symphony of crystal-clear sound and cutting-edge technology at your fingertips. As a seasoned car audio specialist who’s breathed new life into countless vehicles’ entertainment systems, I’ve witnessed the jaw-dropping transformation that a well-executed car Dual XDVD269BT installation can bring. It’s not just about louder music or a flashy screen; it’s about re-imagining your entire driving experience.
From mind-numbing traffic jams to cross-country road trips, the right audio upgrade can turn your car into a rolling oasis of entertainment and connectivity. Today, I’m pulling back the curtain on the installation process of the Dual XDVD269BT, a powerhouse of a head unit that’s been causing quite a stir among audio enthusiasts and everyday drivers alike. Buckle up as we dive into the nitty-gritty of how this compact marvel can revolutionize your time behind the wheel.
1.1 Why upgrade your car’s audio system?
Let’s face it: factory car stereos often leave much to be desired. They’re designed to be one-size-fits-all solutions, which means they rarely excel in any particular area. Over the years, I’ve helped countless car owners break free from the limitations of stock audio systems, and the results are always rewarding. An upgraded system can provide:
– Vastly improved sound quality
– Enhanced connectivity options
– A more intuitive and feature-rich user interface
– Increased resale value for your vehicle
Best Double Din Head Unit for the Money – Top 5 Reviews
1.2 Overview of the Dual XDVD269BT
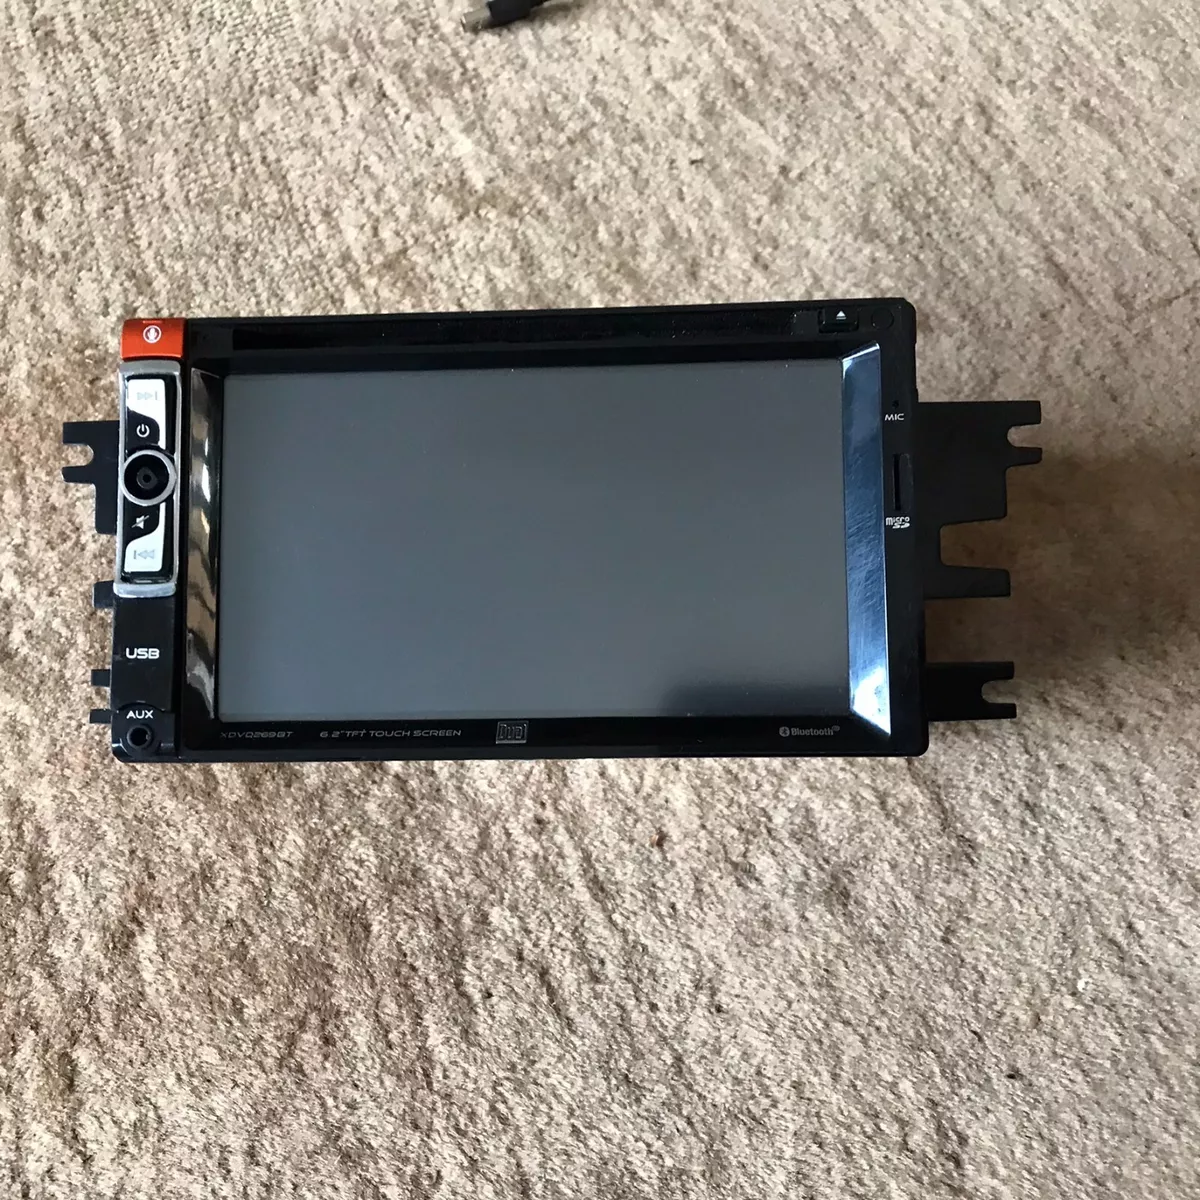
The Dual XDVD269BT is a double DIN head unit that offers a compelling mix of features at an accessible price point. As someone who’s installed dozens of these units, I can attest to its popularity among car audio enthusiasts. Some key features include:
– 6.2″ touchscreen display
– DVD player
– Bluetooth connectivity for hands-free calling and audio streaming
– USB and auxiliary inputs
– AM/FM radio with 18 FM and 12 AM presets
– Rear camera input
What sets this unit apart is its balance of modern features and user-friendly interface, making it an excellent choice for those looking to upgrade from a factory stereo without breaking the bank.
1.3 Benefits of professional-quality installation
While the Dual XDVD269BT is designed to be user-friendly, the installation process can be challenging for those without experience. A professional-quality installation ensures:
– Optimal performance of your new head unit
– Seamless integration with your vehicle’s existing systems
– Preservation of your car’s warranty and resale value
– Safety and reliability
Throughout this guide, I’ll share tips and tricks I’ve learned from years of professional installations to help you achieve a result that rivals what you’d get from a high-end car audio shop.
2. Pre-Installation Preparation
Before we dive into the nitty-gritty of the car dual xdvd269bt installation, it’s crucial to lay the groundwork for a successful upgrade. Proper preparation can save you hours of frustration and ensure a smooth installation process.
2.1 Compatibility check: Is the XDVD269BT right for your vehicle?
The first step in any car audio upgrade is to ensure compatibility between the new head unit and your vehicle. Here’s what you need to consider:
– DIN size: The XDVD269BT is a double DIN unit, meaning it requires a double DIN opening in your dash. If your car has a single DIN slot, you may need a dash kit to accommodate the larger unit.
– Wiring compatibility: Most modern vehicles are compatible with aftermarket head units, but some may require special adapters or harnesses.
– Steering wheel controls: If your car has steering wheel audio controls, you’ll want to ensure they can be integrated with the new unit.
Pro tip: I always recommend checking vehicle-specific forums or consulting with a professional if you’re unsure about compatibility. It’s better to spend a little time researching than to discover mid-installation that you’re missing a crucial component.
2.2 Tools and materials needed
Having the right tools at hand can make or break your installation experience. Here’s a list of essentials I never start a job without:
– Screwdrivers (flathead and Phillips)
– Pliers
– Wire strippers and crimpers
– Electrical tape
– Zip ties
– Panel removal tools
– Digital multimeter (for testing connections)
– Soldering iron and solder (optional but recommended)
Materials you’ll need:
– Wiring harness adapter specific to your vehicle

– Dash kit (if required)

– Antenna adapter (if required)
– Steering wheel control adapter (if applicable)

2.3 Safety precautions and best practices
Safety should always be your top priority when working on your vehicle. Here are some key precautions I always follow and recommend to my clients:
– Disconnect the negative terminal of your car battery before starting any work. This prevents short circuits and protects your vehicle’s electrical system.
– Work in a well-lit, dry area. Avoid working in damp conditions to prevent electrical hazards.
– Use proper tools and avoid forcing components. If something doesn’t fit, double-check your approach.
– Keep track of all screws and small parts. I like to use a magnetic tray or small containers to organize these items.
– Take photos of your existing setup before disassembly. This can be invaluable if you need to reference the original configuration later.
Remember, patience is key. Rushing through an installation is a surefire way to make mistakes or damage components.
3. Removing the Old Head Unit
With our preparations complete, it’s time to start the hands-on work. Removing the old head unit is often the most intimidating part of the process for DIY installers, but with the right approach, it’s entirely manageable.
3.1 Disconnecting the battery
Safety first! Before you touch any wires or components, disconnect the negative terminal of your car battery. This simple step prevents any accidental short circuits and protects both you and your vehicle’s electrical system. Here’s how:
1. Locate your car’s battery. It’s usually under the hood, but some vehicles have it in the trunk or under a seat.
2. Identify the negative terminal. It’s typically marked with a minus (-) sign and has a black cover.
3. Use a wrench to loosen the nut on the negative terminal.
4. Carefully remove the cable from the terminal and secure it away from the battery.
Pro tip: After disconnecting the battery, turn on your car’s headlights for a few seconds. This will discharge any remaining current in the system.
3.2 Removing dash panels and trim
Now comes the part that often makes DIY installers nervous: dismantling the dash. But don’t worry – with care and patience, you can do this without damaging your vehicle’s interior.
1. Start by identifying which panels need to be removed. This varies by vehicle, but typically involves the trim around the radio and sometimes parts of the center console.
2. Use plastic pry tools to carefully loosen the edges of the trim pieces. Never use metal tools for this, as they can scratch or chip your dash.
3. Look for hidden screws or clips. These are often tucked away behind small plastic covers.
4. As you remove each piece, keep track of where each screw and clip came from. I like to use a piece of cardboard with labeled sections to organize these small parts.
Remember, if you feel significant resistance, stop and reassess. There’s likely another clip or screw you’ve missed.
3.3 Unplugging and removing the existing stereo
With the trim removed, you should now have access to your existing head unit. Here’s how to safely remove it:
1. Identify any mounting screws holding the stereo in place. Remove these and set them aside.
2. Gently pull the stereo out of the dash. It may require a bit of wiggling, but it should come out relatively easily.
3. Once you can access the back of the unit, carefully unplug all connections. This typically includes:
– The main wiring harness
– The antenna cable
– Any auxiliary inputs or USB cables
Pro tip: Take a photo of the back of your old stereo before unplugging anything. This can be a helpful reference when connecting your new unit.
With the old unit removed, take a moment to clean the dash opening. Years of dust can accumulate here, and starting with a clean slate makes for a more professional-looking installation.
4. Wiring the Dual XDVD269BT
Now that we’ve cleared the way, it’s time for one of the most critical steps in the car dual xdvd269bt installation process: wiring. This is where attention to detail really pays off.
4.1 Understanding the wiring harness
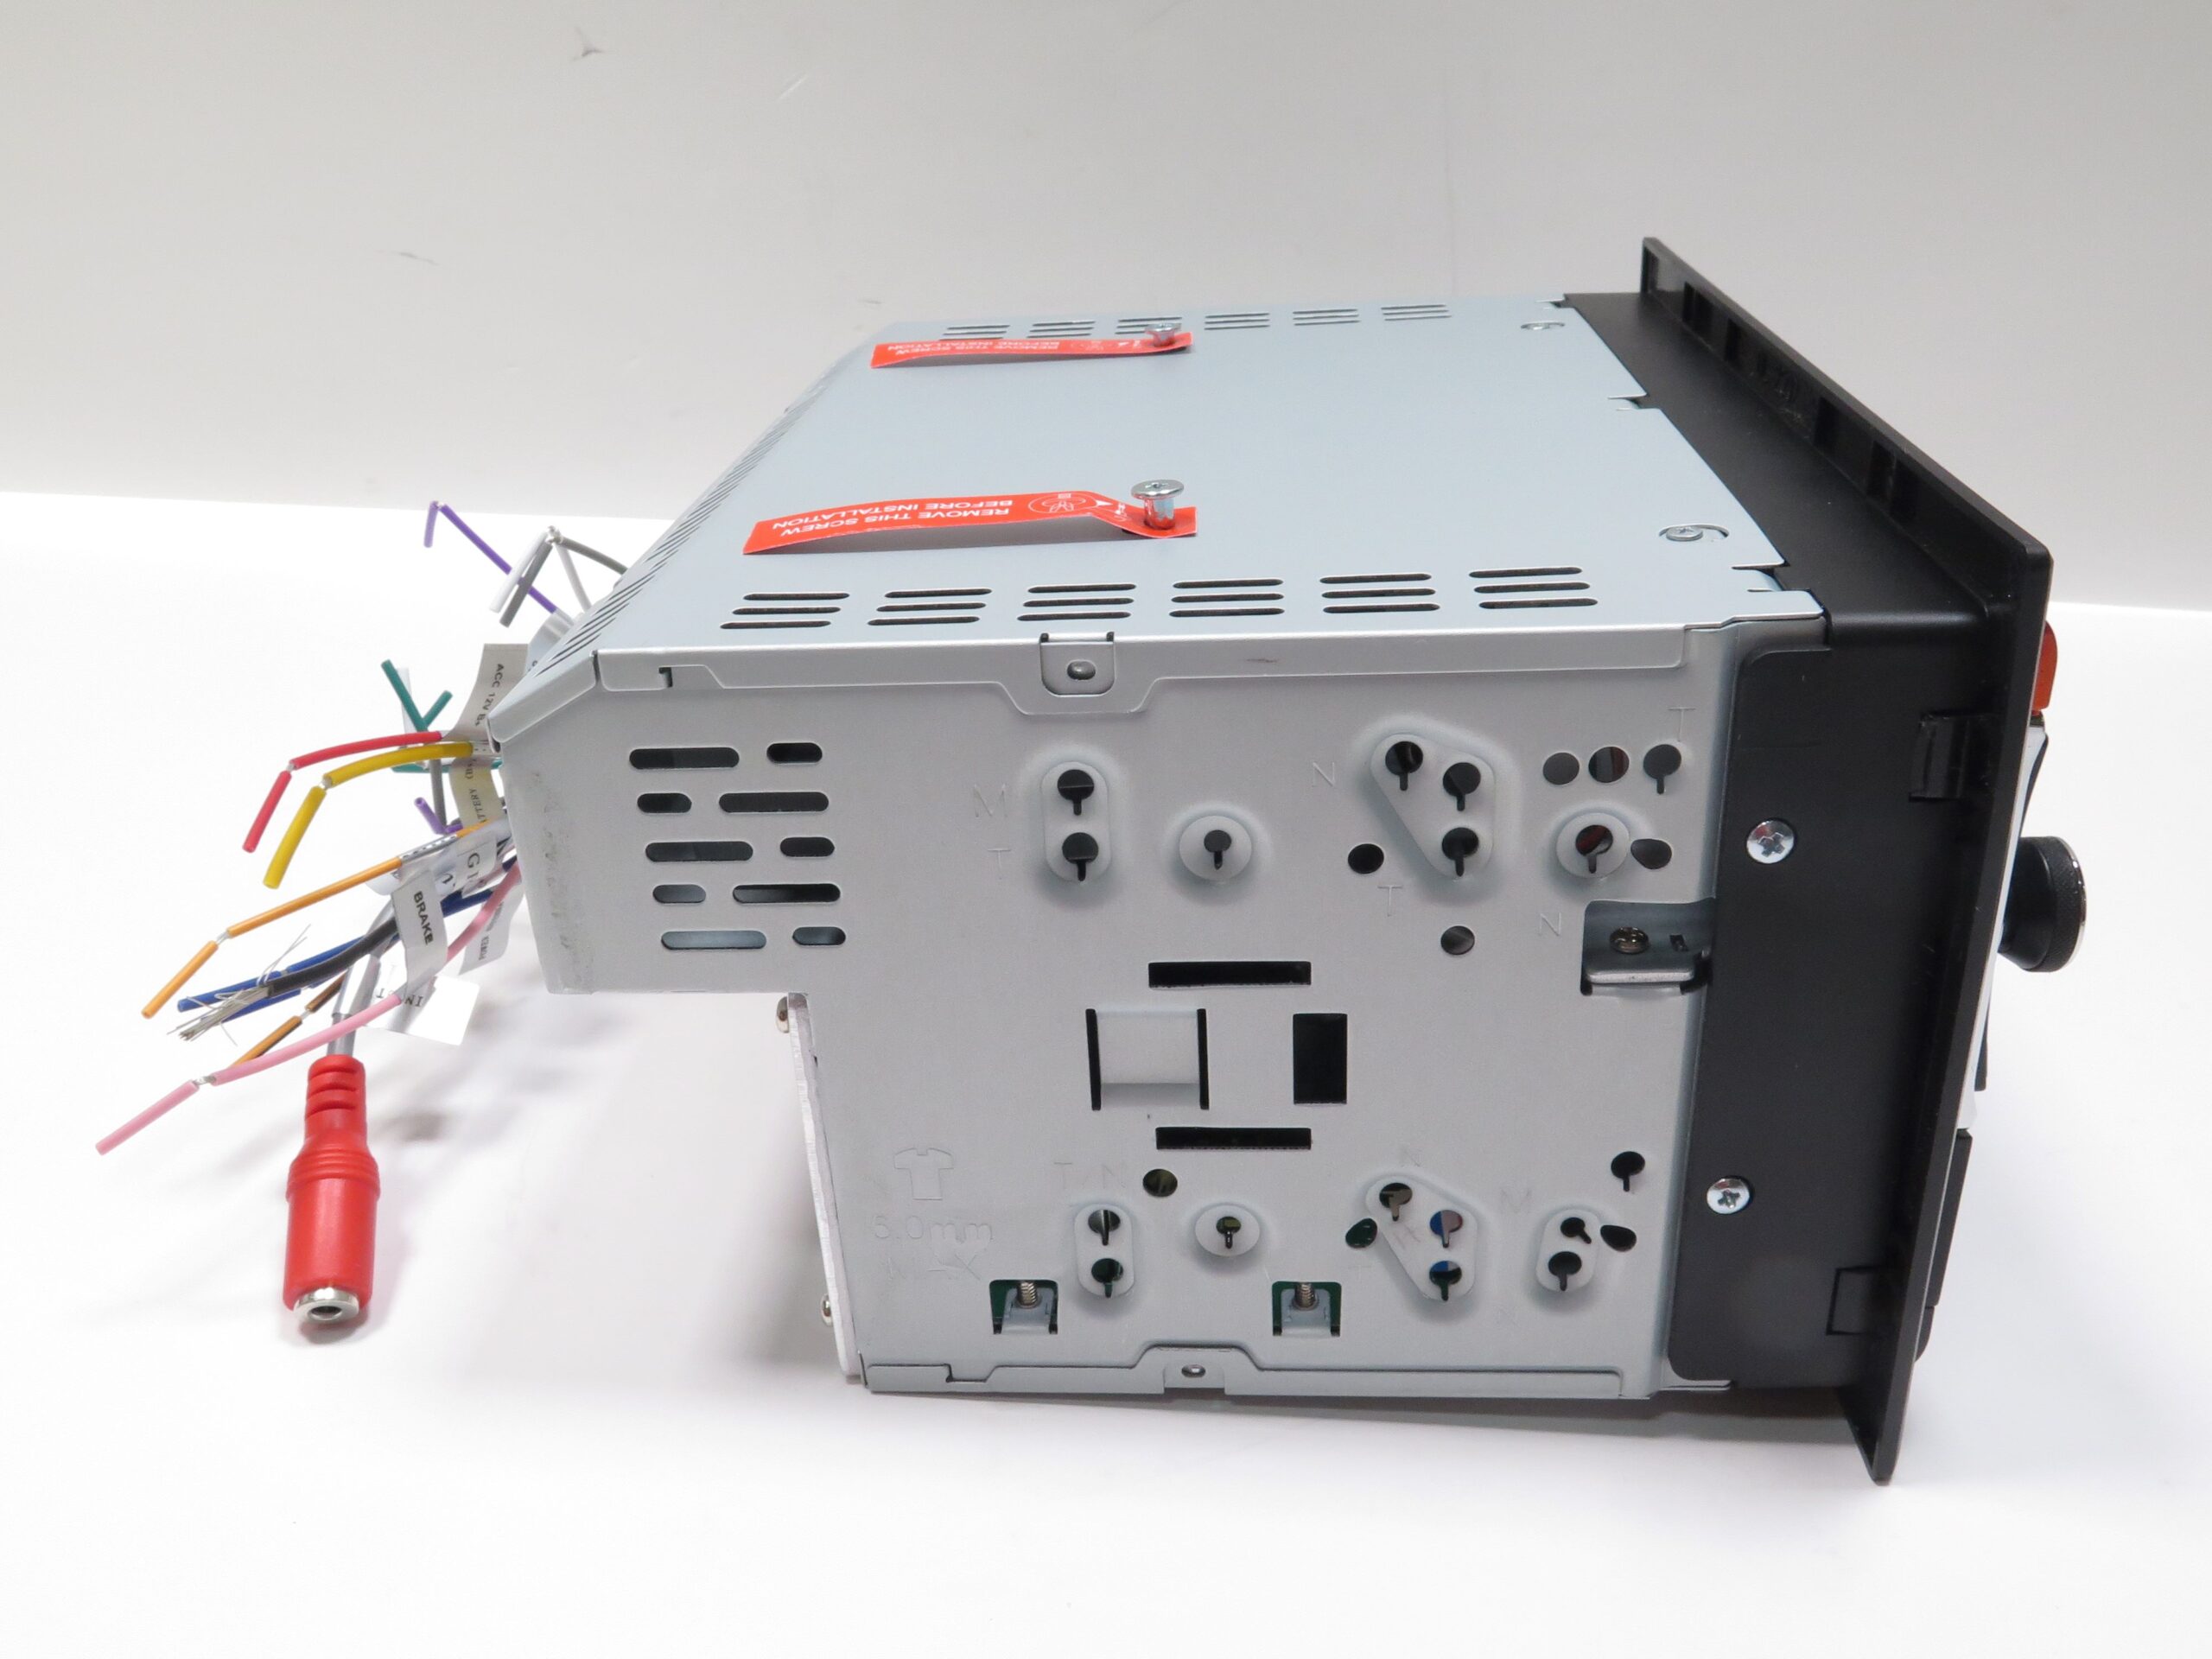
The wiring harness is essentially the nervous system of your car’s audio setup. It connects your new head unit to your vehicle’s electrical system and speakers. Here’s what you need to know:
– The XDVD269BT comes with its own wiring harness.
– You’ll need a vehicle-specific harness adapter to connect the Dual’s harness to your car’s existing wiring.
– These harnesses are color-coded, but don’t assume the colors will match perfectly between the two.
4.2 Color-coding and connecting wires
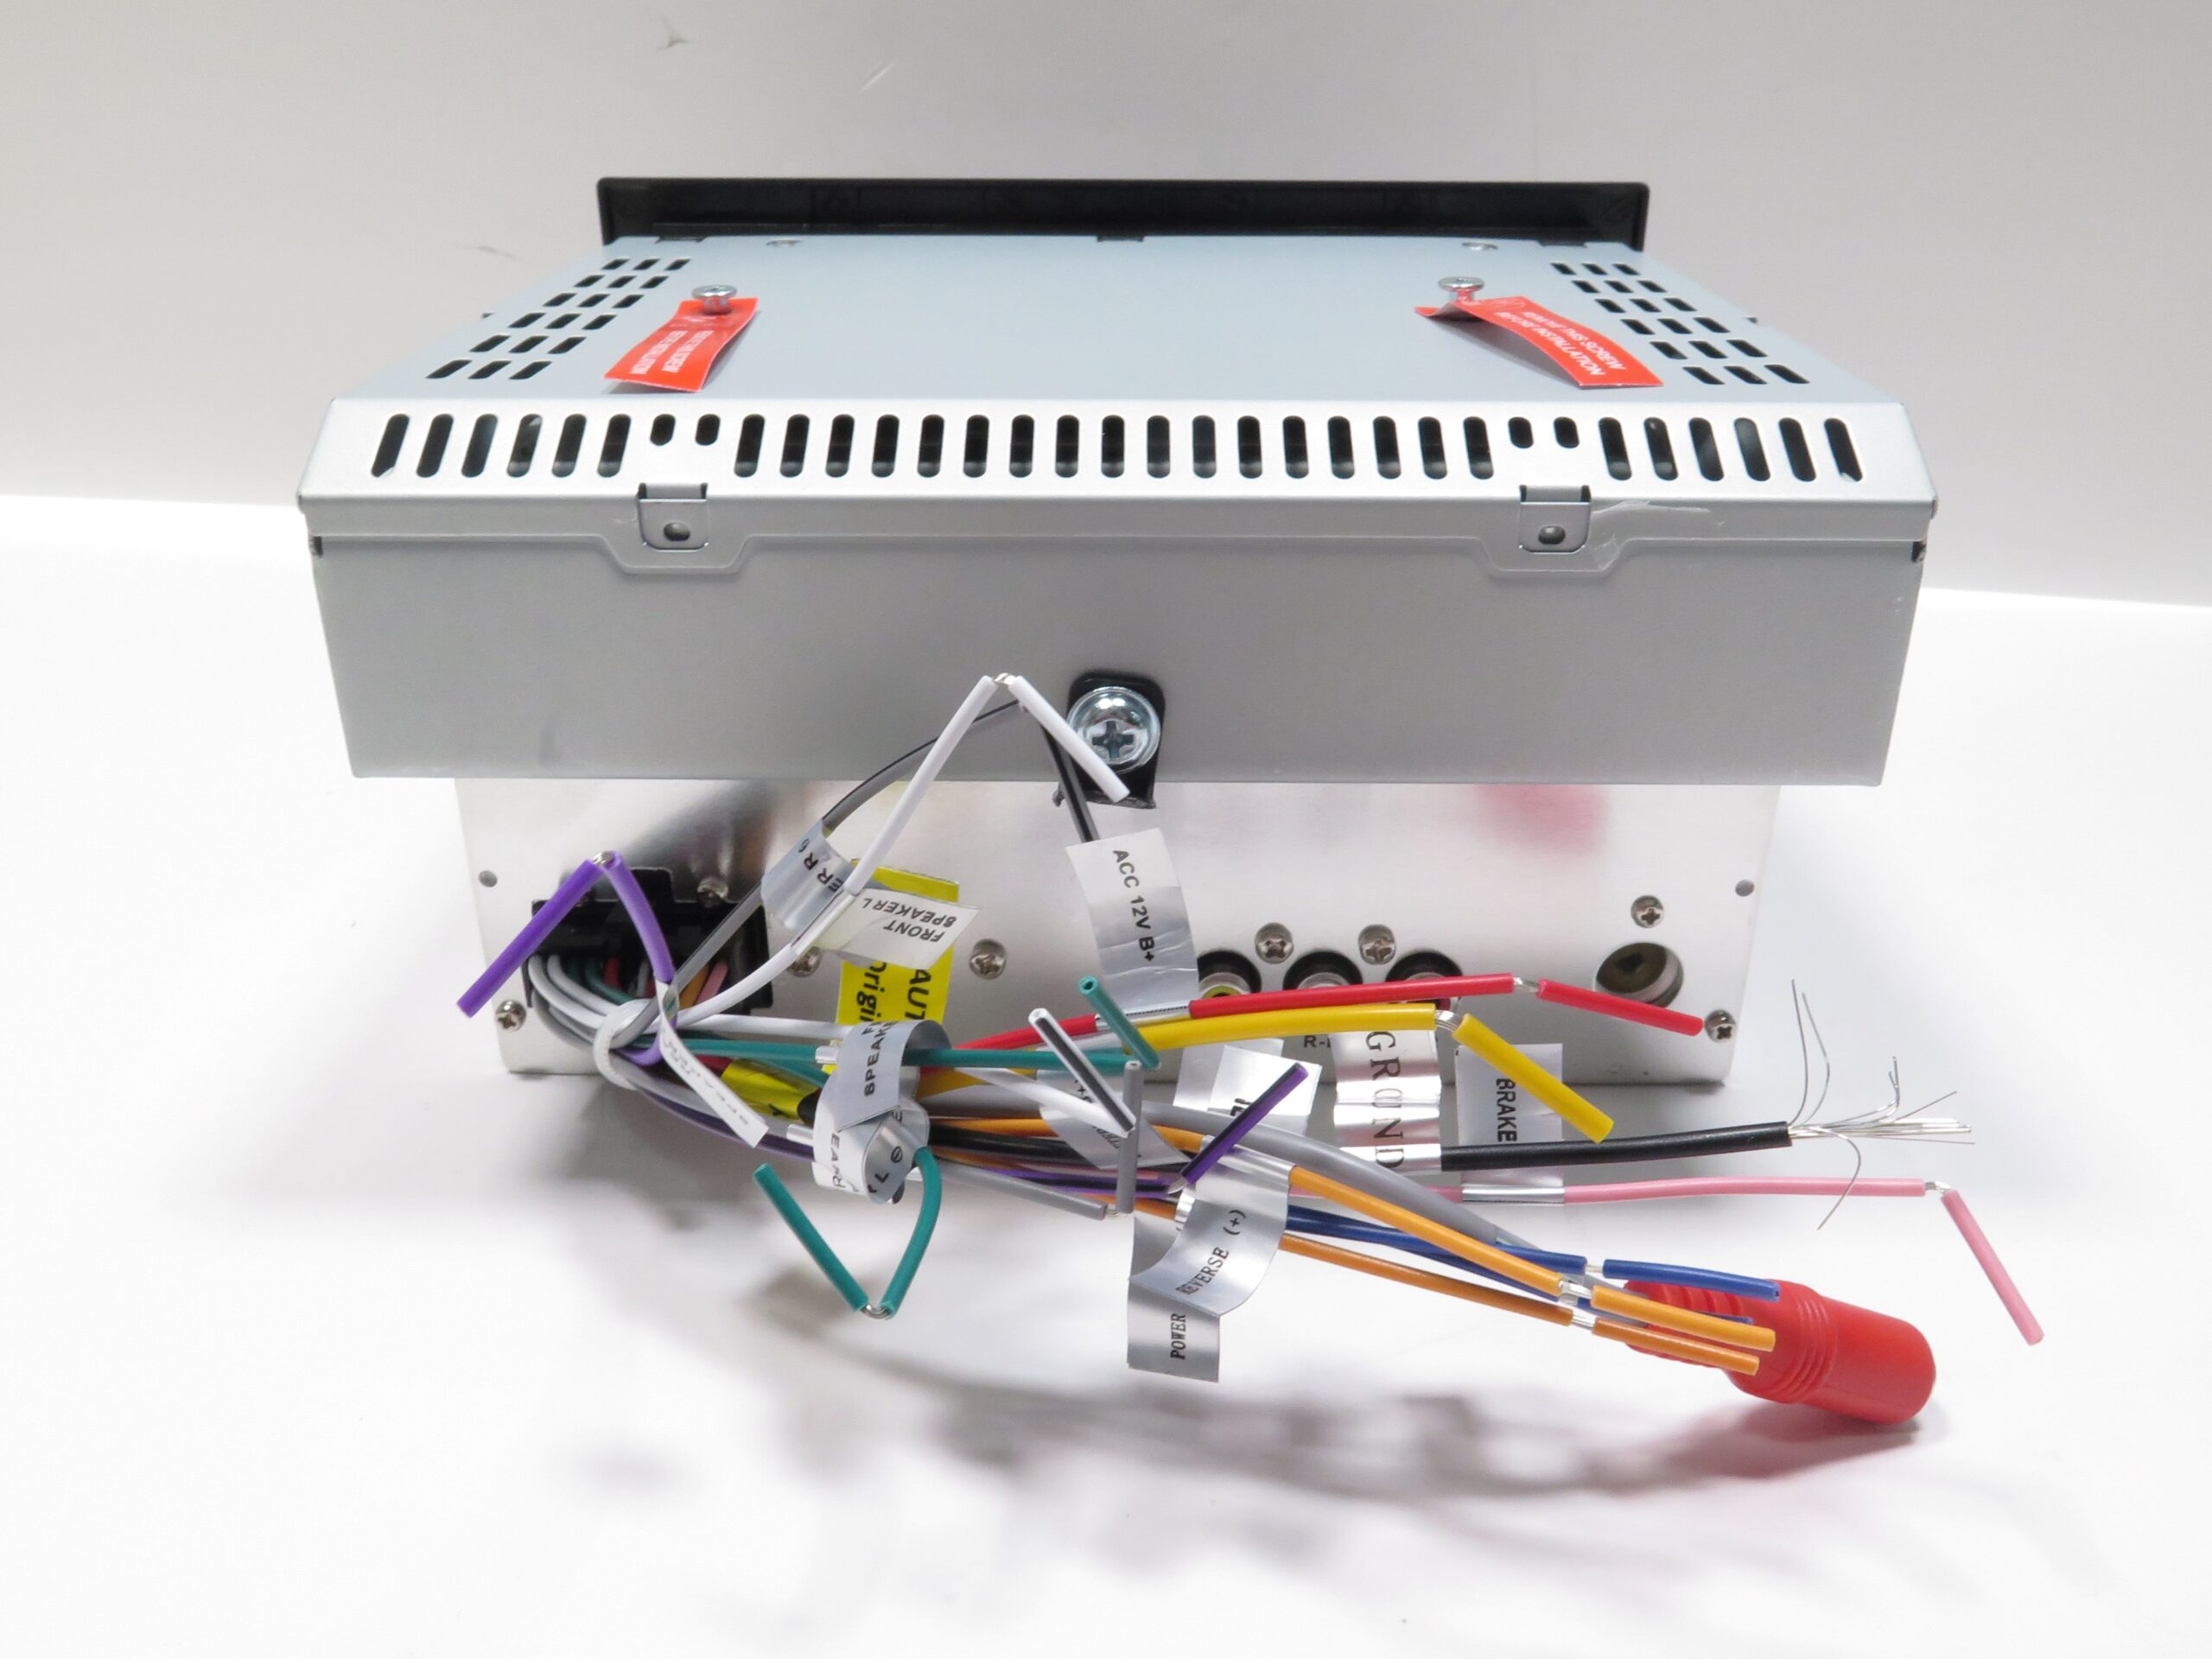
Here’s where my years of experience really come in handy. While the basic color coding is standardized, there can be variations. Here’s a general guide:
– Red: 12V Accessory power (turns on with the ignition)
– Yellow: 12V Constant power
– Black: Ground
– Blue: Power antenna / Amp remote turn on
– Orange: Illumination
– White: Front left speaker (+)
– White/Black: Front left speaker (-)
– Gray: Front right speaker (+)
– Gray/Black: Front right speaker (-)
– Green: Rear left speaker (+)
– Green/Black: Rear left speaker (-)
– Purple: Rear right speaker (+)
– Purple/Black: Rear right speaker (-)
To connect the wires:
1. Strip about half an inch of insulation from the end of each wire.
2. Match the wires from the XDVD269BT harness to the corresponding wires on your vehicle’s harness adapter.
3. Twist the matching wires together.
4. Solder the connections for the most secure and reliable connection. If you’re not comfortable soldering, use crimp caps or electrical tape, but be aware these are less reliable long-term.
Pro tip: Never twist and tape more than two wires together at once. If you need to connect multiple wires (like for grounding), use a distribution block.
4.3 Ground wire installation tips
The ground wire is crucial for proper functioning and sound quality. Here’s how to ensure a good ground:
1. The black ground wire should be connected to bare metal on your vehicle’s chassis.
2. Find a suitable grounding point near the stereo. Many vehicles have a dedicated ground point.
3. If you’re creating your own ground point, sand the area to bare metal and use a ring terminal for a secure connection.
4. Use a self-tapping screw to secure the ground wire, ensuring it’s tight and won’t come loose with vibration.
Remember, a poor ground connection can cause all sorts of issues, from noise in your audio to complete failure of the unit. Take your time to get this right.
5. Physical Installation of the XDVD269BT
With the wiring prepared, we’re ready to physically install the new head unit. This is the moment when your hard work starts to pay off, and you begin to see your upgraded system take shape.
5.1 Mounting bracket installation
Most vehicles require mounting brackets to secure the new head unit in place. Here’s how to handle this step:
1. Identify the correct mounting brackets for your vehicle. These often come with the dash kit if you’re using one.
2. Attach the brackets to the sides of the XDVD269BT. There are usually pre-drilled holes for this purpose.
3. Ensure the brackets are securely fastened and aligned correctly. Misaligned brackets can cause issues with fitment in the dash.
Pro tip: If your vehicle doesn’t require separate mounting brackets, you may need to transfer mounting points from your old radio to the new one. Always refer to your vehicle’s specific requirements.
5.2 Sliding in and securing the head unit
Now comes the exciting part – actually putting the new unit in place:
1. Carefully feed the wiring harness and any other cables (like the antenna cable) through the dash opening and into the cavity behind.
2. Gently slide the XDVD269BT into the dash opening. Take care not to pinch any wires behind the unit.
3. If you’re using a dash kit, make sure the unit sits flush within it.
4. Once the unit is in place, secure it using the screws you removed from the old unit or the ones provided with your mounting kit.
5.3 Reconnecting the battery and initial power-up
With the head unit securely in place, it’s time for the moment of truth:
1. Double-check all your connections one last time.
2. Reconnect the negative terminal of your car battery.
3. Turn your vehicle’s ignition to the “ACC” position.
4. Press the power button on the XDVD269BT.
If all goes well, you should see the unit power up and display its welcome screen. Don’t panic if it doesn’t work immediately – we’ll cover troubleshooting in a later section.
6. Setting Up and Configuring the XDVD269BT
Now that your new head unit is installed and powered up, it’s time to optimize its settings for the best possible performance. This is where the XDVD269BT’s features really start to shine.
6.1 Initial system settings
When you first power on the XDVD269BT, you’ll be greeted with a setup wizard. Here are some key settings to pay attention to:
1. Language: Choose your preferred language for the interface.
2. Time and Date: Set these correctly for accurate display and proper function of time-based features.
3. Display Settings: Adjust brightness, contrast, and color to your liking. Remember, you may want to set different levels for day and night driving.
4. Beep Tone: Decide if you want audible feedback when pressing buttons.
Pro tip: Take your time with these initial settings. They form the foundation of your user experience with the unit.
6.2 Audio adjustments for optimal sound
One of the biggest advantages of the XDVD269BT over many factory stereos is its advanced audio adjustment capabilities. Here’s how to make the most of them:
1. Equalizer (EQ): The unit comes with preset EQ curves, but I always recommend using the custom option for the best results. Adjust each frequency band to suit your preferences and your car’s acoustic environment.
2. Balance and Fader: Use these to ensure sound is distributed evenly throughout your vehicle. Start with them centered and make small adjustments as needed.
3. Subwoofer Settings: If you have a subwoofer connected, adjust its level and crossover frequency. A good starting point for the crossover is usually around 80Hz, but this can vary based on your specific setup.
4. Loudness: This feature boosts low and high frequencies at lower volumes. It can be useful, but use it judiciously as it can color the sound.
Remember, audio preferences are subjective. Don’t be afraid to experiment with these settings to find what sounds best to your ears.
6.3 Connecting and pairing Bluetooth devices
The Bluetooth functionality of the XDVD269BT is one of its standout features. Here’s how to get it set up:
1. Navigate to the Bluetooth settings in the XDVD269BT’s menu.
2. Enable Bluetooth on your phone or other device.
3. Select “Add New Device” on the XDVD269BT.
4. Find the XDVD269BT in your phone’s Bluetooth device list and select it.
5. Confirm the pairing on both devices if prompted.
Once paired, you should be able to stream audio and make hands-free calls through the unit. Take some time to familiarize yourself with the calling interface and audio streaming controls.
Pro tip: For the best audio quality when streaming, make sure your phone’s volume is set to maximum and control the volume through the XDVD269BT.
7. Troubleshooting Common Installation Issues
Even with careful installation, issues can sometimes arise. Don’t worry – most problems have straightforward solutions. Here are some common issues I’ve encountered during car dual xdvd269bt installation processes and how to resolve them.
7.1 No power to the unit
If your XDVD269BT isn’t powering on, try these steps:
1. Check all power connections, especially the red (accessory) and yellow (constant) wires.
2. Verify that the ground connection is secure and making good contact with bare metal.
3. Check the fuse in the XDVD269BT’s wiring harness. Replace it if blown.
4. Test for power at the harness with a multimeter. You should see 12V on both the red and yellow wires with the ignition in the “ACC” position.
If you’re still not getting power, the issue might be with your vehicle’s fuse box. Check the fuses related to the car stereo.
7.2 Audio problems (no sound, distortion, etc.)
Audio issues can be frustrating, but they’re often easily resolved:
1. No sound from one or more speakers:
– Check speaker wire connections at the harness.
– Verify that balance and fader settings aren’t excluding any speakers.
– Test the problematic speaker with a known good audio source to rule out a blown speaker.
2. Distorted sound:
– Reduce the volume and see if distortion persists.
– Check EQ settings – extreme settings can cause distortion.
– Verify that all connections are secure and not loose.
3. Static or interference:
– Check the ground connection. A poor ground is a common cause of audio interference.
– Ensure all wiring is routed away from potential sources of interference like engine components or other electrical systems.
– If you have an amplifier installed, check its ground connection as well.
4. Low volume output:
– Verify that the gain settings on any external amplifiers are properly adjusted.
– Check the XDVD269BT’s internal amplifier settings in the audio menu.
– Ensure the correct speaker impedance is selected in the unit’s settings.
7.3 Bluetooth connectivity issues
Bluetooth problems can be particularly frustrating. Here’s how to troubleshoot them:
1. Unable to pair devices:
– Ensure Bluetooth is enabled on both the XDVD269BT and your phone.
– Try deleting any existing pairings and start fresh.
– Check if your phone’s software is up to date.
2. Frequent disconnections:
– Keep your phone within reasonable range of the head unit.
– Check for interference from other electronic devices.
– Ensure the XDVD269BT’s firmware is up to date.
3. Poor audio quality during calls:
– Check the position of the Bluetooth microphone. It should be mounted near the driver, typically on the A-pillar or sun visor.
– Adjust the mic gain settings in the XDVD269BT’s Bluetooth menu.
Remember, persistence is key when troubleshooting. If you’ve gone through these steps and are still experiencing issues, it may be time to consult with a professional or contact Dual Electronics’ customer support.
8. Enhancing Your XDVD269BT Setup
Once you’ve got the basic car dual xdvd269bt installation down and everything is working smoothly, you might want to consider some enhancements to really maximize your in-car entertainment experience.
8.1 Adding a backup camera
One of the great features of the XDVD269BT is its compatibility with backup cameras. Here’s how to add one:
1. Choose a compatible backup camera. Make sure it outputs the correct video signal for the XDVD269BT.
2. Mount the camera according to the manufacturer’s instructions. Typically, this involves installing it near your license plate.
3. Run the camera’s video cable to the XDVD269BT. This usually means routing it under your car’s interior panels.
4. Connect the camera’s power wire to your reverse light circuit. This ensures the camera activates when you shift into reverse.
5. Plug the video cable into the XDVD269BT’s camera input.
6. Enable the backup camera function in the XDVD269BT’s settings menu.
Pro tip: When routing the camera cable, use grommets when passing through any metal panels to prevent cable damage.
8.2 Integrating with steering wheel controls
If your vehicle has steering wheel audio controls, you can integrate them with the XDVD269BT:
1. Purchase a steering wheel control adapter compatible with your vehicle and the XDVD269BT.
2. Connect the adapter to your vehicle’s steering wheel control wires. This often requires tapping into specific wires behind the steering column.
3. Connect the adapter to the XDVD269BT’s steering wheel control input.
4. Program the adapter according to its instructions. This usually involves holding certain buttons on your steering wheel to assign functions.
Integrating steering wheel controls can greatly enhance your driving experience, allowing you to control your audio system without taking your hands off the wheel.
8.3 Expanding with additional speakers or a subwoofer
To really take your audio to the next level, consider adding or upgrading speakers:
1. Upgrading existing speakers: Replace your factory speakers with high-quality aftermarket options. Make sure to match the size and impedance of your factory speakers.
2. Adding a subwoofer: A subwoofer can add depth and richness to your audio:
– Choose a powered subwoofer for easier installation, or a passive subwoofer with a separate amplifier for more customization.
– Mount the subwoofer in your trunk or under a seat, depending on your vehicle and preferences.
– Connect the subwoofer to the XDVD269BT’s subwoofer output.
– Adjust the crossover and level settings in the XDVD269BT’s audio menu to blend the subwoofer with your other speakers.
3. Adding an amplifier: An external amplifier can provide more power and clarity:
– Choose an amplifier that matches your power needs and speaker configuration.
– Mount the amplifier in a well-ventilated area, typically in the trunk.
– Connect the amplifier to the XDVD269BT’s pre-amp outputs.
– Run power directly from the battery to the amplifier, making sure to include an in-line fuse.
Remember, when adding any components, ensure your vehicle’s electrical system can handle the additional load. You may need to upgrade your alternator or battery if you’re adding significant power.
9. Maintenance and Care Tips
To ensure your XDVD269BT continues to perform optimally for years to come, proper maintenance is key. Here are some tips I always share with my clients after completing a car dual xdvd269bt installation.
9.1 Cleaning the touchscreen and faceplate
Regular cleaning not only keeps your unit looking great but also ensures the touchscreen remains responsive:
1. Use a soft, lint-free microfiber cloth to gently wipe the screen and faceplate.
2. For stubborn dirt or fingerprints, slightly dampen the cloth with distilled water or a specialized electronics cleaner.
3. Never spray cleaner directly onto the unit. Always apply it to the cloth first.
4. Avoid using harsh chemicals, abrasive materials, or excessive pressure when cleaning.
Pro tip: Keep a microfiber cloth in your glove compartment for quick touch-ups.
9.2 Software updates and why they matter
Keeping your XDVD269BT’s software up to date is crucial for optimal performance:
1. Check Dual Electronics’ website periodically for available updates.
2. Updates can improve functionality, fix bugs, and sometimes even add new features.
3. Follow the manufacturer’s instructions carefully when performing updates.
4. Ensure your vehicle’s battery is fully charged or connected to a battery maintainer during updates to prevent interruptions.
Remember, interrupting a software update can potentially render your unit inoperable, so always follow the instructions carefully.
9.3 Protecting your investment from theft and damage
Your new head unit is valuable, both monetarily and for your driving experience. Here’s how to protect it:
1. Use a security code: Set up the XDVD269BT’s security feature if available. This makes the unit useless if stolen.
2. Consider a detachable faceplate cover when available.
3. Park in well-lit areas and avoid leaving valuables visible in your car.
4. Invest in a good car alarm system for overall vehicle protection.
5. Consider window tinting to make it harder for potential thieves to see inside your vehicle.
10. User Experiences and Reviews
Throughout my years of installing car audio systems, I’ve gathered a wealth of feedback from clients who’ve chosen the XDVD269BT. Here’s a summary of real-world experiences to give you a well-rounded view of this head unit.
10.1 Performance reports
Most users report high satisfaction with the XDVD269BT, particularly praising:
1. Ease of use: The intuitive interface is often mentioned as a standout feature.
2. Sound quality: Many users note a significant improvement over their factory stereos.
3. Bluetooth connectivity: The reliable and clear Bluetooth functionality is frequently praised.
4. Value for money: Users often comment on the impressive feature set for the price point.
However, some users have noted:
1. Boot-up time can be slightly slow compared to some competitors.
2. The screen brightness could be better for daytime visibility in some cases.
10.2 Comparison with factory stereos and other aftermarket options
Compared to factory stereos, the XDVD269BT typically offers:
1. Superior sound quality and adjustment options
2. More connectivity options (Bluetooth, USB, aux)
3. Larger, more responsive touchscreen
4. Additional features like backup camera compatibility
When compared to other aftermarket options, the XDVD269BT holds its own:
1. It offers a good balance of features and affordability
2. While it may lack some premium features of high-end units (like built-in navigation), it covers all the essentials most users need
10.3 Long-term reliability insights
Based on feedback from long-term users and my own observations, the XDVD269BT has proven to be a reliable unit:
1. Most users report no significant issues after years of use
2. The touchscreen remains responsive over time, a common concern with cheaper units
3. Bluetooth connectivity remains stable, even with newer phone models
4. Firmware updates have addressed minor bugs and improved performance over time
However, as with any electronic device, proper care and maintenance are key to ensuring longevity.
11. Conclusion
As we wrap up this comprehensive guide to car dual xdvd269bt installation, let’s recap the key points and reflect on the impact of this upgrade.
11.1 Recap of key installation steps
The journey of upgrading your car’s audio system with the XDVD269BT involves several crucial steps:
1. Thorough preparation, including compatibility checks and gathering necessary tools
2. Careful removal of the old head unit
3. Precise wiring of the new unit, paying special attention to color coding and ground connections
4. Physical installation of the XDVD269BT, ensuring a secure and flush fit
5. Initial setup and configuration, including audio adjustments and Bluetooth pairing
6. Troubleshooting any issues that may arise
7. Potential enhancements like adding a backup camera or integrating steering wheel controls
Each of these steps is important in ensuring a successful installation and optimal performance of your new head unit.
11.2 The transformative impact of a well-installed XDVD269BT
From my years of experience in car audio installations, I can confidently say that upgrading to a unit like the XDVD269BT can truly transform your driving experience. Here’s how:
1. Enhanced entertainment: With features like Bluetooth streaming and USB connectivity, your music options are vastly expanded.
2. Improved sound quality: The XDVD269BT’s advanced audio settings allow you to tailor the sound to your preferences and your car’s acoustic environment.
3. Increased safety: Features like backup camera compatibility can significantly improve your awareness while driving.
4. Modern connectivity: Seamless integration with your smartphone keeps you connected safely while on the road.
5. Increased vehicle value: A well-installed aftermarket head unit can be a selling point if you ever decide to part with your vehicle.
11.3 Encouragement for DIY installation (with cautions)
While professional installation has its benefits, I believe that with the right preparation, tools, and patience, many car audio enthusiasts can successfully install the XDVD269BT themselves. The process can be rewarding, providing not just a great end result but also a sense of accomplishment and a deeper understanding of your vehicle’s systems.
However, it’s crucial to approach the task with respect for your own limitations. If at any point you feel unsure or overwhelmed, don’t hesitate to seek professional help. Remember, the goal is not just to complete the installation, but to do so safely and in a way that ensures optimal performance of your new head unit.
In conclusion, the Dual XDVD269BT offers a compelling upgrade path for those looking to enhance their in-car entertainment experience. Whether you choose to tackle the installation yourself or opt for professional help, the end result is a more capable, more enjoyable car audio system that can make every drive a little bit better.
12. FAQs
To round out our comprehensive guide, let’s address some frequently asked questions about the car dual xdvd269bt installation process and the unit itself.
12.1 How long does the installation typically take?
For an experienced installer, a straightforward XDVD269BT installation usually takes about 2-3 hours. However, for a DIY enthusiast doing it for the first time, it’s wise to set aside a full day. This allows time for careful work, double-checking connections, and troubleshooting if needed. Remember, rushing the installation is often counterproductive and can lead to mistakes.
12.2 Can I install the XDVD269BT if my car has a single DIN slot?
Yes, it’s possible to install the XDVD269BT in a car with a single DIN slot, but it requires some additional work. You’ll need to purchase a double DIN conversion kit specific to your vehicle model. These kits typically involve replacing part of your dash to accommodate the larger unit. Keep in mind that this process is more complex than a standard installation and may require professional help if you’re not comfortable with significant modifications to your dash.
12.3 Will I lose my steering wheel controls after installation?
Not necessarily. The XDVD269BT is compatible with most steering wheel control systems, but you’ll need an additional interface module to make it work. These modules translate the signals from your car’s steering wheel controls to commands the XDVD269BT can understand. When purchasing this module, make sure it’s compatible with both your specific vehicle model and the XDVD269BT.
12.4 Is professional installation worth the extra cost?
While many enthusiasts can successfully install the XDVD269BT themselves, professional installation does offer several benefits:
1. Expertise: Professionals have experience with a wide range of vehicles and can handle unexpected issues.
2. Time-saving: What might take you a full day could be completed in a few hours by a pro.
3. Warranty: Many shops offer warranties on their installation work.
4. Complex integrations: If you’re adding multiple components or have a complex vehicle electrical system, professional help can be invaluable.
Ultimately, the decision depends on your comfort level with car electronics, the complexity of your specific installation, and how you value your time versus money.
12.5 How does the XDVD269BT compare to other Dual models?
The XDVD269BT sits in the middle of Dual’s product range, offering a good balance of features and affordability. Compared to lower-end Dual models, it offers a larger screen, better audio adjustment capabilities, and often more powerful amplification. Higher-end Dual models might offer features like built-in navigation, HD Radio, or larger screen sizes, but the XDVD269BT covers all the essentials that most users need.
When choosing between Dual models, consider which features are most important to you. For many users, the XDVD269BT hits the sweet spot of functionality and value.
In conclusion, the car dual xdvd269bt installation process, while detailed, is certainly achievable for many car audio enthusiasts. It offers a significant upgrade to most factory stereos and can truly enhance your driving experience. Whether you choose to install it yourself or opt for professional installation, the XDVD269BT can bring new life to your vehicle’s entertainment system, making every journey more enjoyable.
Best 4 Inch Car Speakers – Top 10 Reviews
Best 6.5 Car Speakers- Top 10 Picks and Reviews

Kenny Owen is an acclaimed audio expert and longtime enthusiast with a deep passion for sound technology. With over 15 years of experience in the car and home audio industry, Kenny has established himself as a trusted authority on everything from speaker setups and amplifier configurations to the latest audio equipment and innovations.
Through his engaging writing style and meticulously researched articles, Kenny shares his vast knowledge on optimizing audio systems for superior sound quality. He provides in-depth tips and tricks for achieving the best listening experience, whether it’s tuning a car’s audio system for an immersive musical journey or creating a high-fidelity home theater setup. Additionally, Kenny’s comprehensive buying guides empower readers to make informed decisions when investing in audio components, ensuring they get the most bang for their buck.